Nitin Dangwal, a Competency Head - Salesforce at Cynoteck, is an experienced Salesforce professional with a remarkable 15+ year tenure in the IT industry. Starting as a Cobol developer, he transitioned to Salesforce, recognizing its vast potential in the realm of cloud computing. Nitin's extensive 15+ years of experience in Salesforce CRM have been pivotal Read More
We are Microsoft Gold partner with its presence across the United States and India. We are a dynamic and professional IT services provider that serves enterprises and startups, helping them meet the challenges of the global economy. We offer services in the area of CRM Consultation and implementation, Application development, Mobile application development, Web development & Offshore Development.
Omnichannel is a new buzzword in the business world, which means to seamlessly deliver customer services/support on multiple channels. Omni-channel is one of the essential parts of the Salesforce service cloud. It promotes customer cases (problem/issue) to the live agent (users) in real-time. Omni-Channel is a customizable, flexible feature, which can be configured declaratively in Salesforce—that is, without any need of writing code.
Omni-Channel helps automatic routing of different types of work items (such as Cases and Leads) to agents. It routes all the work items to the agents automatically based on the agent’s capability, skillset, priority, etc. The end result is agents that can assist their consumers more efficiently, leading to improved operational efficiency.
Salesforce releases a new feature Omni-Channel as a Beta in Summer ‘15 and GA as of the Winter ‘16 release. This tool sits inside either the Sales or Service Console. It is a flexible, customizable feature that can be configured without writing a single code. Once this is enabled and configured automatically it pushes the right work to the right person who has the capacity to help in real-time.
Omni-Channel currently supports cases, leads, chats, SOS video calls, orders, social posts, and custom objects. For example, through omnichannel one can configure routing rules to assign cases to agents or configure routing rules to assign leads to salespeople.
Now, let us see the steps for setting up the Omni-Channel feature in Salesforce.
Here is the complete Omni channel implementation guide in Salesforce.
How to setup Omni-Channel in an org.
Navigate to Setup -> Build - Customize -> Omni-Channel -> Omni-Channel Settings and click on checkbox Enable Omni-Channel
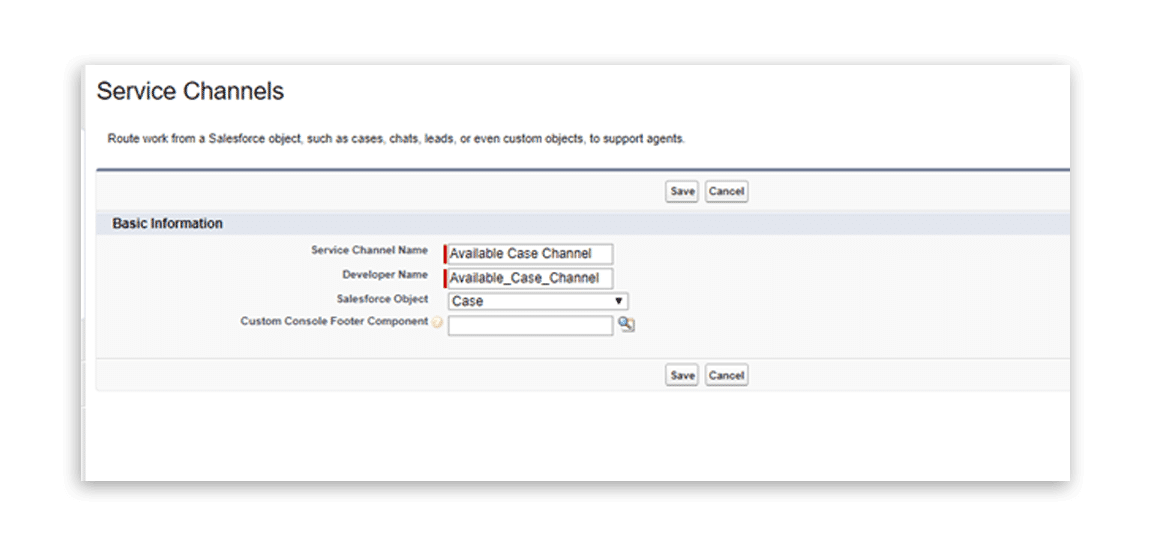
Step 1: Create a Service Channel
Navigating to Setup -> Build -> Customize -> Omni-Channel -> Service Channel
Now, you need to set up Service Channel in the next step, which determines which object should be enabled for Omni-Channel objects such as a case, lead, SOS session, or even a custom object. And also, can assign Custom Console Component as a footer.
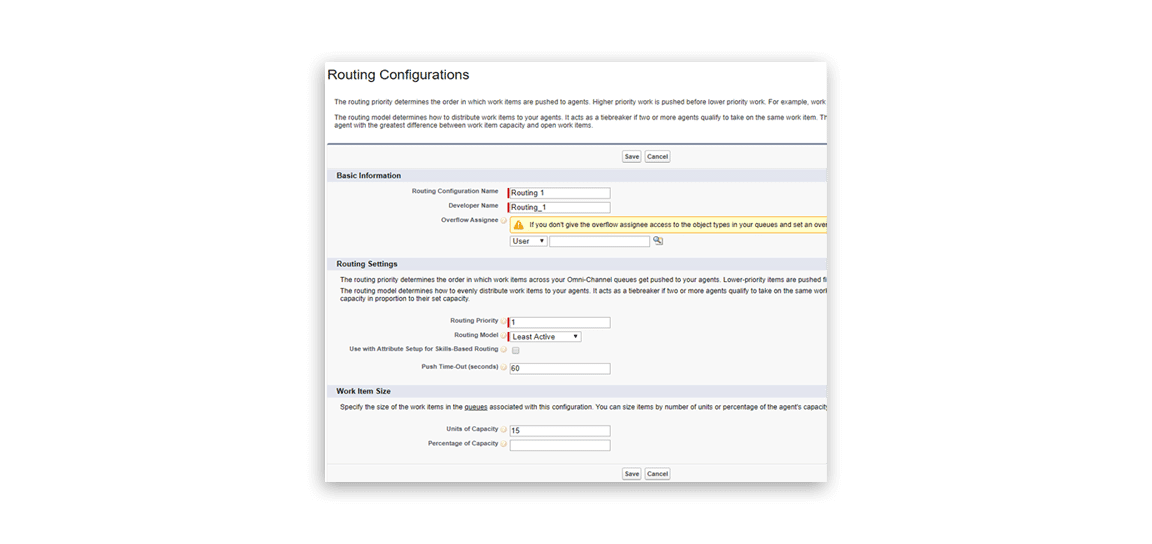
Now, under this step, you need to fill in three essential pieces of information for routing configuration.
Basic Information – This is the essential section in which you must add Name of Routing configuration, Developer Name, and Overflow Assignee (If you don’t provide the overflow assignee access to the object types in your queues and arrange an overflow assignee to every routing configuration, overflow assignments will not work.)
Routing Setting – In this, you need to determine the order in which work items across your Omni-Channel queues get pushed to your agents. Lower-priority items are pushed first. This setting determines how to evenly distribute work items to your agents. If two or more agents qualify to take on the same work item, then it acts as a tiebreaker. Most available routes to the agent with the most open capacity in proportion to their set capability. Least active routes to the agent with the fewest number of open work items.
Push Time-Out (seconds) – Amount of time agent has to accept a work assignment before the request is routed to another agent.
Work Item Size – In this section, you need to give a size of the work item and what is the percentage capacity.
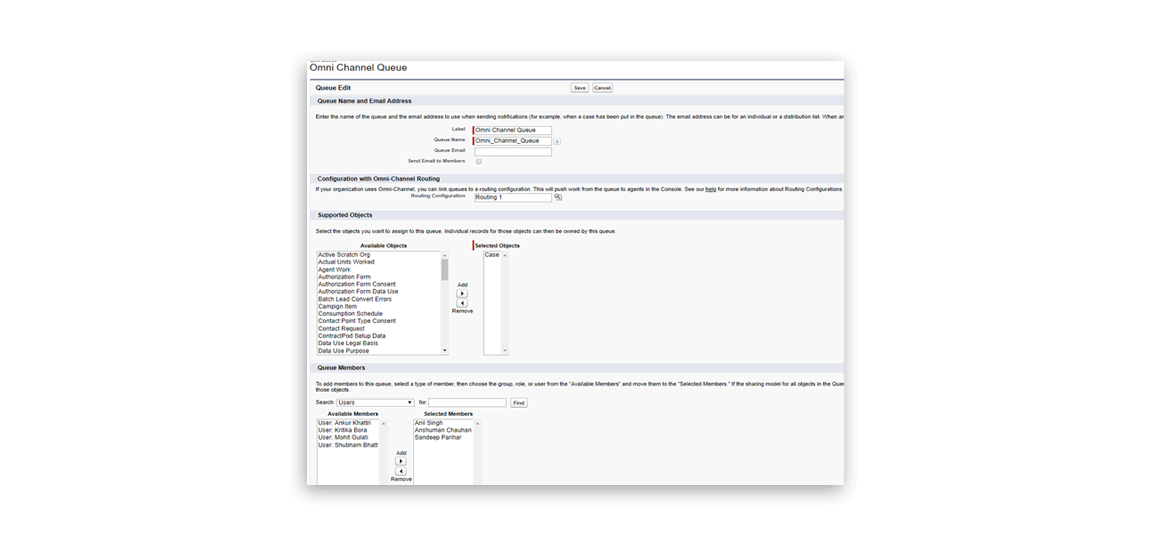
In this step, you need to create a new Queue that will configure with Omni Channel Routing. This will drive work from the queue to agents in the Console. In the Queue Member, you need to choose the users to whom the works are assigned.
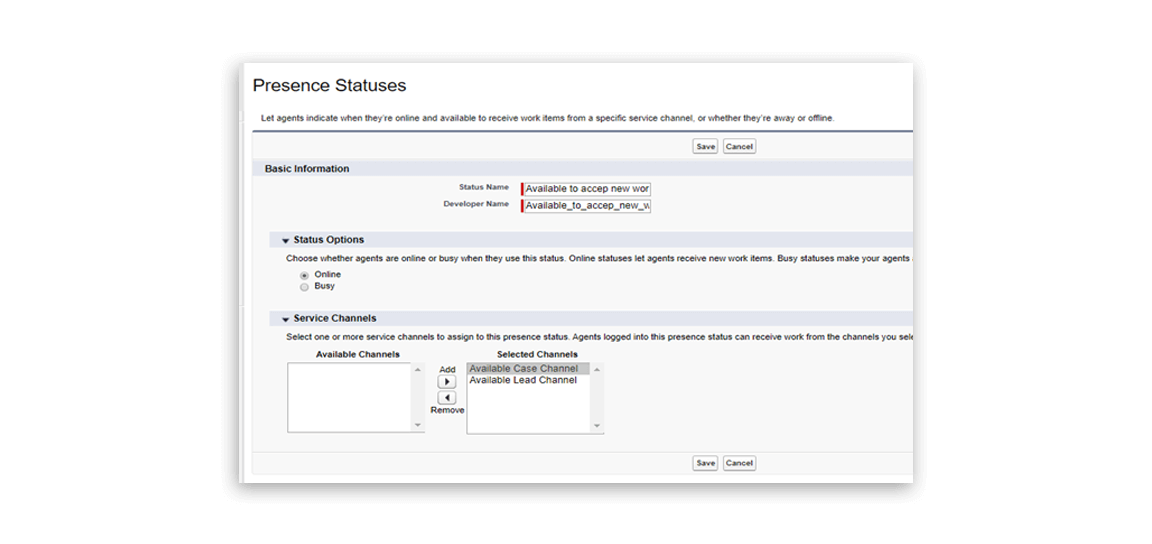
In the Presence Statuses there are only two options: -
a) Online b) Busy
Online statuses let agents receive new work items and busy statuses make the agents appear away and indicate that they are unavailable to receive work items.
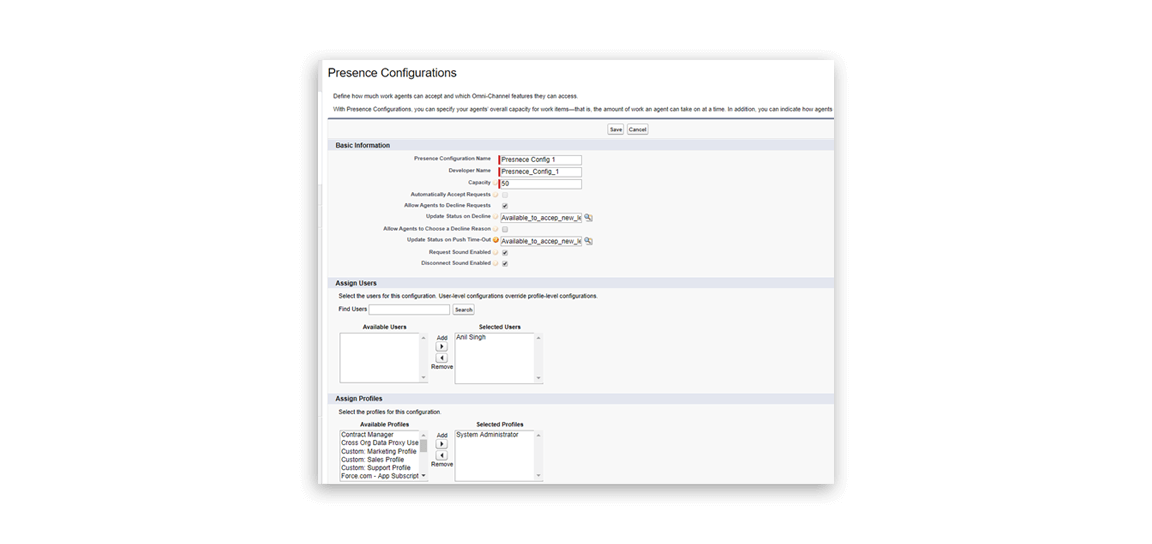
In this setting, you define how much work agents can accept and which Omni-Channel they can access. With Presence Configurations, you can specify your agents’ overall capacity for work items i.e. the amount of work an agent can take on at a time. In addition, you can indicate how agents can interact with work that was assigned to them, such as whether or not agents can decline assignments.
Step 6: Granting access to Profile for Presence Statuses
Now in this step, you simply need to open the particular Profile page to whom you want to provide access for Presence Statuses. You can simply add the Presence Status name under the related list name “Enable Service Presence Statuses Access”.
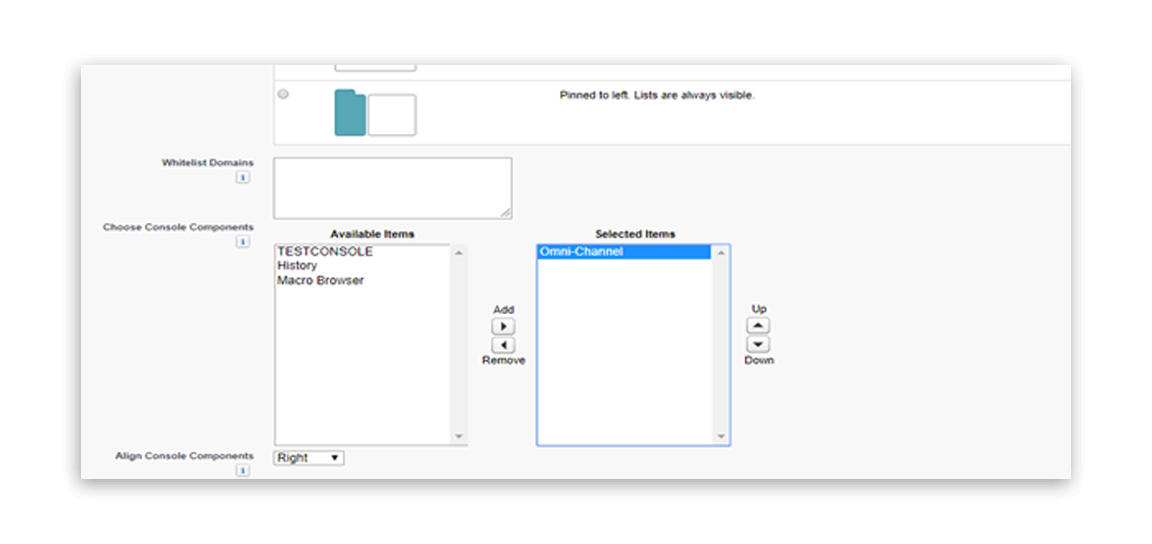
Step 7: Adding Omni Channel
This is the final step to complete the Omni Channel setup. If you want to use the Omnichannel in Classic mode, you need to add the Omni Channel component in the Service Console app.
Navigating to Setup -> Build -> Create -> App -> Click on Edit of “Service Console” app
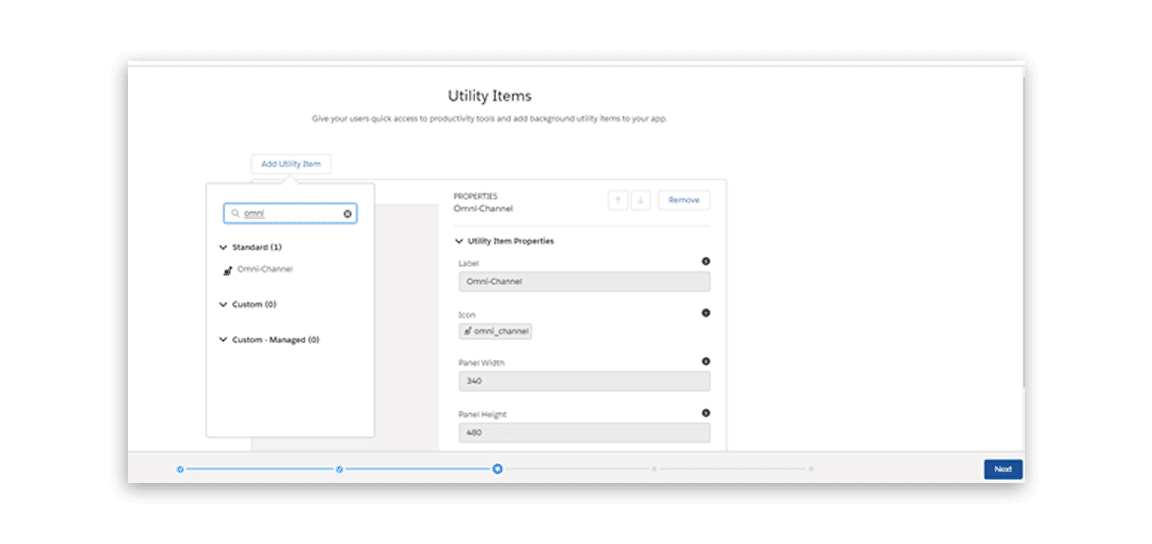
If you want to use the Omni Channel in the Lightning mode, you just need to create or edit App and Add Omni Channel using “Add Utility Item”.
After your Omni-Channel Salesforce implementation is set up and enabled, you need to test your implementation to ensure that it’s working perfectly.
Now, to test your implementation, you need to route a work item to yourself in the console:
1) First, log in to the console where you added Omni-Channel.
2) Ensure that you log in as a user who’s allowed to use Omni-Channel.
3) When testing the feature, you need to make sure that you’re the only agent who’s signed into the Omni-Channel.
4) Now open Omni-Channel and modify your status so that you can get incoming work items.
5) Under the console, you need to navigate to the record that corresponds to the service channel that you’ve set for your existing presence status.
For instance, if you’re logged in with a status called “Available for Cases,” then navigate to a list of your open cases in the console.
If you are using Salesforce Classic, then you need to choose the checkbox next to the record that you want to route to yourself. If you’re operating Lightning Experience, you need to open the record you want to route to yourself.
Click on the Change Owner.
Select Queue.
Now enter the name of the queue that you associated with your routing configuration.
Click Submit.
Sit and relax. You’ll notice an incoming request notification in Omni-Channel within a few seconds.
Five elements of a Winning Omni Channel Strategy
An omni channel strategy is a business approach that aims to provide customers with a seamless and consistent experience across all channels, including in-store, online, social media, and mobile. Here are five elements that can help you create a winning omnichannel strategy:
Customer-centric approach: Your omnichannel strategy should be designed with your customers in mind. This means understanding their needs, preferences, and behavior, and using this information to create a cohesive and intuitive experience across all channels.
Seamless integration: A key aspect of an omnichannel strategy is ensuring that all channels are integrated and work together seamlessly. This includes ensuring that customer data is consistent and up-to-date across all channels, and that the customer journey is smooth and frictionless.
Personalization: Personalization is important in any customer experience, and it is especially crucial in an omnichannel strategy. By using customer data to tailor the experience to individual customers, you can create a more personalized and relevant experience.
Omnichannel communication: An effective omnichannel strategy requires effective communication between all channels. This includes ensuring that customer inquiries or complaints are addressed quickly and consistently across all channels.
Continuous optimization: An omnichannel strategy should be viewed as a work in progress, and you should be constantly looking for ways to optimize and improve the customer experience. This may involve A/B testing different approaches or using customer feedback to make changes and improvements.
How to Implement a Successful Omnichannel Strategy
Here are some steps you can follow to implement a successful omnichannel strategy:
Define your goals: Clearly define what you want to achieve with your omnichannel strategy. Do you want to increase customer engagement, improve customer satisfaction, or drive sales? Your goals will help guide the development of your strategy.
Understand your customers: To create a successful omnichannel strategy, you need to understand your customers and their needs, preferences, and behavior. Conduct market research and gather customer data to help you get a better understanding of your target audience.
Develop a customer journey map: Create a map that outlines the various steps a customer takes as they interact with your brand across different channels. This will help you identify any pain points or areas for improvement in the customer experience.
Integrate your systems: Ensure that all of your systems, including your CRM, e-commerce platform, and in-store POS system, are integrated and work together seamlessly. This will allow you to provide a consistent and cohesive experience to your customers across all channels.
Create a cohesive brand experience: Your brand experience should be consistent across all channels. This includes your messaging, branding, and design elements.
Train your employees: Make sure your employees are trained on your omnichannel strategy and how to use the various tools and systems that support it.
Implement personalization: Use customer data to personalize the customer experience and create a more relevant and engaging experience.
Monitor and optimize: Regularly monitor and analyze the performance of your omnichannel strategy and look for opportunities to optimize and improve the customer experience.
Conclusion
Omni-Channel in Salesforce for consumer service is a complete customer service solution that allows contact centres to push work to their agents in real-time. With Omni-Channel, you can bring a variety of channels, whether social or web or another network, and construct a Salesforce object based on it. Utilizing the Omni-channel feature in Salesforce, you can deliver custom work assignments automatically as per the eligibility of agents in real-time. It prioritizes the work and makes efficient utilization of work management/agent capacity.
1) What is the finest use case for Omni-Channel in a Salesforce implementation?
Omni-Channel implementation in Salesforce is best for smaller organizations that support a finite number of products. You allocate skills to agents and required skills to work item kinds. Omni-Channel matches work items to agents who have all the needed skills.
2) How do you define Omni-Channel reporting?
Omnichannel insights reports provide extensive information on how overall support is functioning across channels.
3) What is Omni analysis?
Omni analysis is the only solution that produces a homogeneous view of usage patterns and IT service quality across multiple applications and technologies in your IT infrastructure and therefore provides the foundation for your decision-making process.
4) How is an omnichannel marketing strategy helpful?
Omnichannel marketing is the seamless integration of messaging, branding, and online & offline touchpoints. As customers move down the sales funnel, it allows a more impactful consumer experience.
Omnichannel is a new buzzword in the business world, which means to seamlessly deliver customer services/support on multiple channels. Omni-channel is one of the essential parts of the Salesforce service cloud. It promotes customer cases (problem/issue) to the live agent (users) in real-time. Omni-Channel is a customizable, flexible feature, which can be configured declaratively in Salesforce—that is, without any need of writing code.
Omni-Channel helps automatic routing of different types of work items (such as Cases and Leads) to agents. It routes all the work items to the agents automatically based on the agent’s capability, skillset, priority, etc. The end result is agents that can assist their consumers more efficiently, leading to improved operational efficiency.
Salesforce releases a new feature Omni-Channel as a Beta in Summer ‘15 and GA as of the Winter ‘16 release. This tool sits inside either the Sales or Service Console. It is a flexible, customizable feature that can be configured without writing a single code. Once this is enabled and configured automatically it pushes the right work to the right person who has the capacity to help in real-time.
Omni-Channel currently supports cases, leads, chats, SOS video calls, orders, social posts, and custom objects. For example, through omnichannel one can configure routing rules to assign cases to agents or configure routing rules to assign leads to salespeople.
Here is the complete Omni channel implementation guide in Salesforce.
How to setup Omni-Channel in an org.
Navigate to Setup -> Build – Customize -> Omni-Channel -> Omni-Channel Settings and click on checkbox Enable Omni-Channel
Step 1: Create a Service Channel
Navigating to Setup -> Build -> Customize -> Omni-Channel -> Service Channel
Now, you need to set up Service Channel in the next step, which determines which object should be enabled for Omni-Channel objects such as a case, lead, SOS session, or even a custom object. And also, can assign Custom Console Component as a footer.
Now, under this step, you need to fill in three essential pieces of information for routing configuration.
Basic Information – This is the essential section in which you must add Name of Routing configuration, Developer Name, and Overflow Assignee (If you don’t provide the overflow assignee access to the object types in your queues and arrange an overflow assignee to every routing configuration, overflow assignments will not work.)
Routing Setting – In this, you need to determine the order in which work items across your Omni-Channel queues get pushed to your agents. Lower-priority items are pushed first. This setting determines how to evenly distribute work items to your agents. If two or more agents qualify to take on the same work item, then it acts as a tiebreaker. Most available routes to the agent with the most open capacity in proportion to their set capability. Least active routes to the agent with the fewest number of open work items.
Push Time-Out (seconds) – Amount of time agent has to accept a work assignment before the request is routed to another agent.
Work Item Size – In this section, you need to give a size of the work item and what is the percentage capacity.
In this step, you need to create a new Queue that will configure with Omni Channel Routing. This will drive work from the queue to agents in the Console. In the Queue Member, you need to choose the users to whom the works are assigned.
In the Presence Statuses there are only two options: –
a) Online b) Busy
Online statuses let agents receive new work items and busy statuses make the agents appear away and indicate that they are unavailable to receive work items.
In this setting, you define how much work agents can accept and which Omni-Channel they can access. With Presence Configurations, you can specify your agents’ overall capacity for work items i.e. the amount of work an agent can take on at a time. In addition, you can indicate how agents can interact with work that was assigned to them, such as whether or not agents can decline assignments.
Step 6: Granting access to Profile for Presence Statuses
Now in this step, you simply need to open the particular Profile page to whom you want to provide access for Presence Statuses. You can simply add the Presence Status name under the related list name “Enable Service Presence Statuses Access”.
Step 7: Adding Omni Channel
This is the final step to complete the Omni Channel setup. If you want to use the Omnichannel in Classic mode, you need to add the Omni Channel component in the Service Console app.
Navigating to Setup -> Build -> Create -> App -> Click on Edit of “Service Console” app
If you want to use the Omni Channel in the Lightning mode, you just need to create or edit App and Add Omni Channel using “Add Utility Item”.
After your Omni-Channel Salesforce implementation is set up and enabled, you need to test your implementation to ensure that it’s working perfectly.
Now, to test your implementation, you need to route a work item to yourself in the console:
1) First, log in to the console where you added Omni-Channel.
2) Ensure that you log in as a user who’s allowed to use Omni-Channel.
3) When testing the feature, you need to make sure that you’re the only agent who’s signed into the Omni-Channel.
4) Now open Omni-Channel and modify your status so that you can get incoming work items.
5) Under the console, you need to navigate to the record that corresponds to the service channel that you’ve set for your existing presence status.
For instance, if you’re logged in with a status called “Available for Cases,” then navigate to a list of your open cases in the console.
If you are using Salesforce Classic, then you need to choose the checkbox next to the record that you want to route to yourself. If you’re operating Lightning Experience, you need to open the record you want to route to yourself.
Click on the Change Owner.
Select Queue.
Now enter the name of the queue that you associated with your routing configuration.
Click Submit.
Sit and relax. You’ll notice an incoming request notification in Omni-Channel within a few seconds.
Five elements of a Winning Omni Channel Strategy
An omni channel strategy is a business approach that aims to provide customers with a seamless and consistent experience across all channels, including in-store, online, social media, and mobile. Here are five elements that can help you create a winning omnichannel strategy:
Customer-centric approach: Your omnichannel strategy should be designed with your customers in mind. This means understanding their needs, preferences, and behavior, and using this information to create a cohesive and intuitive experience across all channels.
Seamless integration: A key aspect of an omnichannel strategy is ensuring that all channels are integrated and work together seamlessly. This includes ensuring that customer data is consistent and up-to-date across all channels, and that the customer journey is smooth and frictionless.
Personalization: Personalization is important in any customer experience, and it is especially crucial in an omnichannel strategy. By using customer data to tailor the experience to individual customers, you can create a more personalized and relevant experience.
Omnichannel communication: An effective omnichannel strategy requires effective communication between all channels. This includes ensuring that customer inquiries or complaints are addressed quickly and consistently across all channels.
Continuous optimization: An omnichannel strategy should be viewed as a work in progress, and you should be constantly looking for ways to optimize and improve the customer experience. This may involve A/B testing different approaches or using customer feedback to make changes and improvements.
How to Implement a Successful Omnichannel Strategy
Here are some steps you can follow to implement a successful omnichannel strategy:
Define your goals: Clearly define what you want to achieve with your omnichannel strategy. Do you want to increase customer engagement, improve customer satisfaction, or drive sales? Your goals will help guide the development of your strategy.
Understand your customers: To create a successful omnichannel strategy, you need to understand your customers and their needs, preferences, and behavior. Conduct market research and gather customer data to help you get a better understanding of your target audience.
Develop a customer journey map: Create a map that outlines the various steps a customer takes as they interact with your brand across different channels. This will help you identify any pain points or areas for improvement in the customer experience.
Integrate your systems: Ensure that all of your systems, including your CRM, e-commerce platform, and in-store POS system, are integrated and work together seamlessly. This will allow you to provide a consistent and cohesive experience to your customers across all channels.
Create a cohesive brand experience: Your brand experience should be consistent across all channels. This includes your messaging, branding, and design elements.
Train your employees: Make sure your employees are trained on your omnichannel strategy and how to use the various tools and systems that support it.
Implement personalization: Use customer data to personalize the customer experience and create a more relevant and engaging experience.
Monitor and optimize: Regularly monitor and analyze the performance of your omnichannel strategy and look for opportunities to optimize and improve the customer experience.
Conclusion
Omni-Channel in Salesforce for consumer service is a complete customer service solution that allows contact centres to push work to their agents in real-time. With Omni-Channel, you can bring a variety of channels, whether social or web or another network, and construct a Salesforce object based on it. Utilizing the Omni-channel feature in Salesforce, you can deliver custom work assignments automatically as per the eligibility of agents in real-time. It prioritizes the work and makes efficient utilization of work management/agent capacity.
1) What is the finest use case for Omni-Channel in a Salesforce implementation?
Omni-Channel implementation in Salesforce is best for smaller organizations that support a finite number of products. You allocate skills to agents and required skills to work item kinds. Omni-Channel matches work items to agents who have all the needed skills.
2) How do you define Omni-Channel reporting?
Omnichannel insights reports provide extensive information on how overall support is functioning across channels.
3) What is Omni analysis?
Omni analysis is the only solution that produces a homogeneous view of usage patterns and IT service quality across multiple applications and technologies in your IT infrastructure and therefore provides the foundation for your decision-making process.
4) How is an omnichannel marketing strategy helpful?
Omnichannel marketing is the seamless integration of messaging, branding, and online & offline touchpoints. As customers move down the sales funnel, it allows a more impactful consumer experience.