What is the Salesforce Nonprofit Success Pack?
The Nonprofit Success Pack NPSP sits on top of Salesforce Enterprise Edition, it is a collection of organized packages designed and maintained by Salesforce.org, available for free through the Salesforce AppExchange. For-profits, you can utilize it to track sales leads, marketing initiatives, and clients. Meanwhile, nonprofits can utilize this donor management solution for their prospect research, fundraising leads, and other aspects of fundraising campaigns.
The Salesforce Nonprofit Success Pack is offered to organizations as a free solution to assist them to get started using their Salesforce CRM.
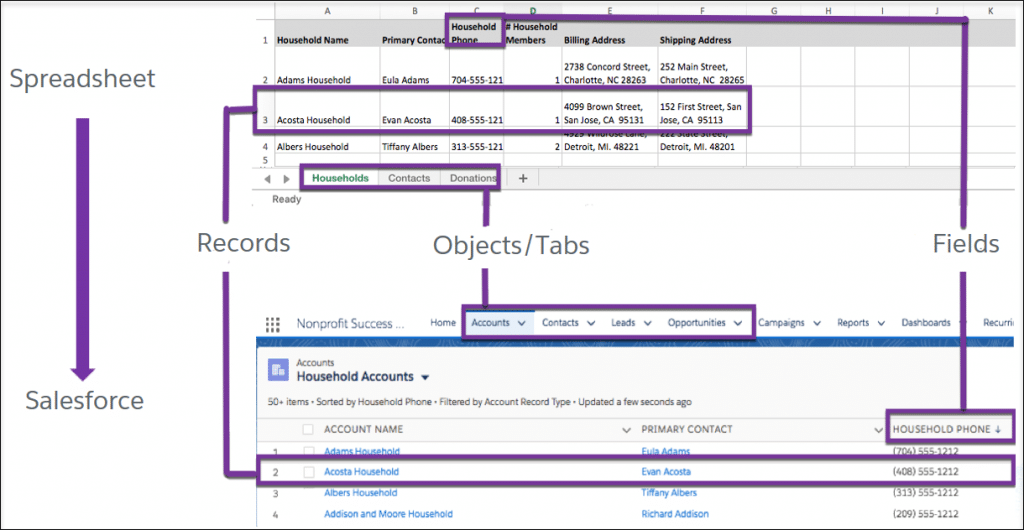
- Object: Objects are considered like the spreadsheets that you utilize to track information. They are the tabs located at the top of your Salesforce screen that calculate different aspects of your nonprofit. Contacts, accounts, leads, and opportunities are considered as the standard objects, these are a part of Salesforce. You can furthermore make custom objects to track specific priorities.
- Fields: Every object includes fields united with it. This is the place you discover the details of the object that you’re looking at. For example, under your “accounts” object, you might have a field for client contact details like their cell phone number.
- Records: Records are like the cells of a spreadsheet. This is the place where you input information per the field of that data and the correct object. For example, within the “accounts” object, you may include a field for the donor’s name, and the record displays that the donor’s name is Phil Smith.
The Nonprofit Success Pack utilizes the standard Salesforce objects particularly to manage nonprofit data: -
- Accounts are used to organize records about supporters’ households, companies, and other sources of funding.
- Contacts track data regarding individual stakeholders such as volunteers, donors, members, etc.
- Opportunities have records of fulfilled or promised donations.
Campaigns are utilized to assist your nonprofit, track the progress of each activity and task. You can bind them to specific opportunities.
Also, read: Salesforce security: the guide to keeping your business and customer data safe
Salesforce Nonprofit Success Pack Data Model:
| Object | Use |
| Account | Donor or client households, companies, foundation funders, or other organizations with whom your organization has a relationship. There are two major types of accounts that you can make in NPSP: Organizations and Households. Organization accounts are utilized for any other accounts such as corporate donors, vendors, funders, government institutions, or other business commodities. Household accounts are utilized to track member or donor households. |
| Contact | Individual stakeholders in your organization. All contacts must be connected to an account. The contacts object can be used to track donors, members, volunteers, clients, and staff — basically, any individual that interacts with your organization. |
| Opportunity | Potential revenue-generating activities like donations, grants, or membership fees are tracked over time, from pledge to received. These could include: financial contributions from a person or a company, grants from a funder, contracts from a government institution, or sales of merchandise related to your organization. |
| Campaign | Any outreach you would like to plan, track, and organize. Opportunities can be credited to a campaign (or multiple campaigns) to determine your return on investment. |

Also, read: 7 Reports in Salesforce that will help you boost revenue
Customize Household Naming:
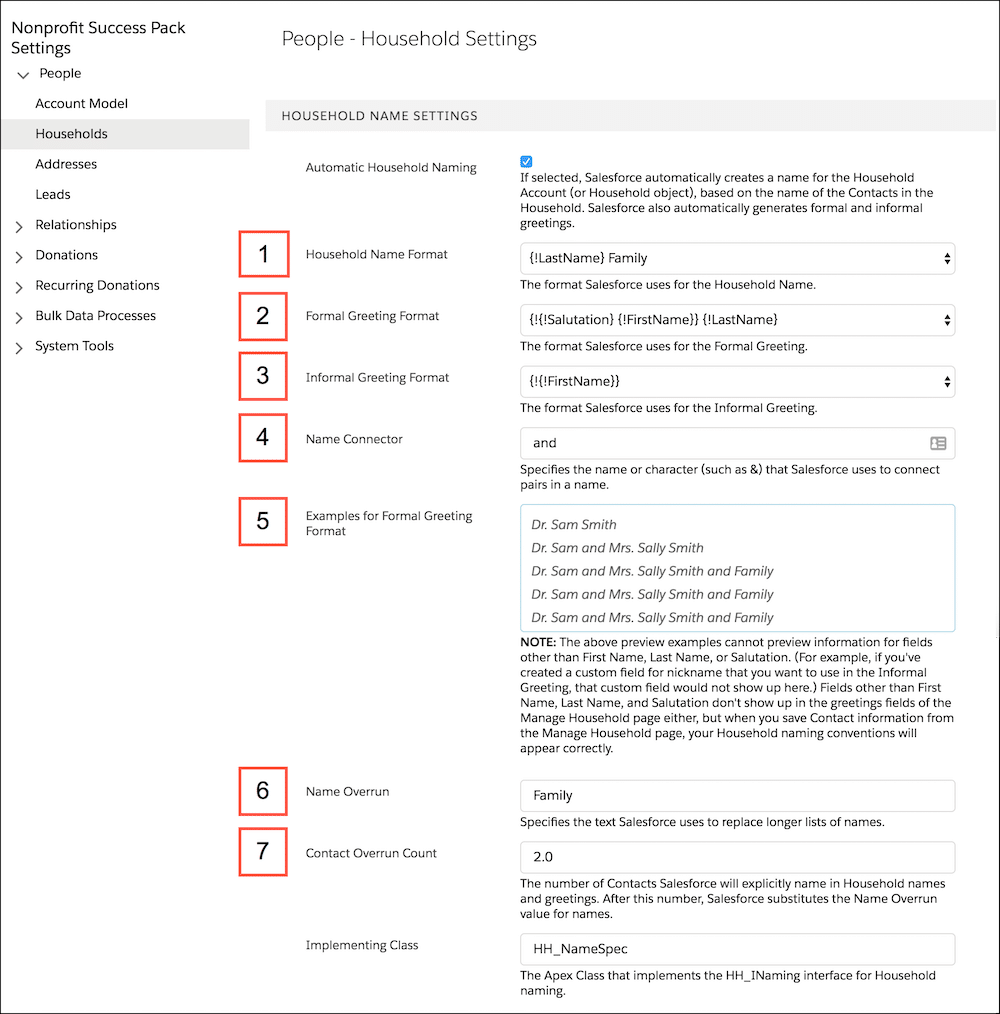
- The household name format is the format that the NPSP uses to determine the household account name. NPSP offers you numerous different options above the default option of {Last Name} Household. Let’s take a look at how NMH customizes its household naming settings.
- Click the NPSP Settings object. If you don’t see the tab, you can find it from the app launcher (
).
- Click People > Households.
- 3. Click Edit at the top of the page.
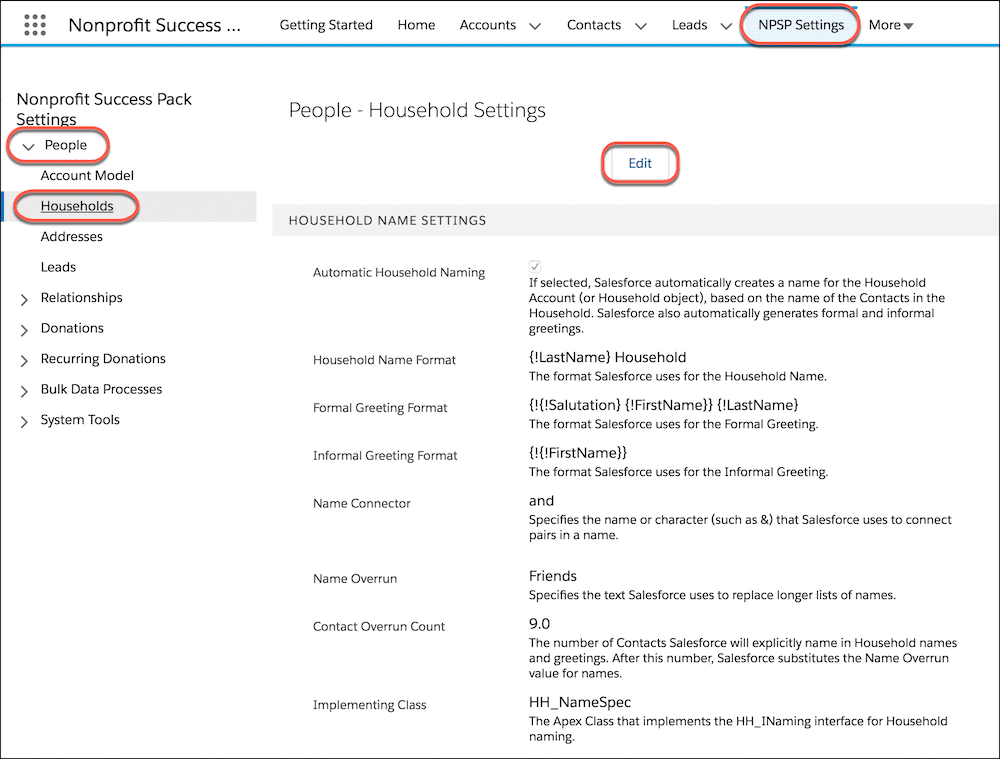
(1) From the Household Name Format menu, select the format that appeals to you. The NMH stakeholders agreed on {! LastName} Family as their default, so Gorav makes that selection and takes a look at the preview. Gorav then moves on to customize the formal and informal greetings.
(2) The Formal Greeting Format is the format that NPSP uses to determine how a household’s formal greeting appears. Like household naming, NPSP offers you numerous different options past the default.
(3) The Informal Greeting Format is the format NPSP uses to determine how a household’s informal greeting appears. Again, NPSP gives you many different options beyond the default.
Gorav selects {!{!Salutation} {!FirstName}} {!LastName} and {!{!FirstName}} respectively and previews the changes to ensure it displays as he intended. As you make different selections, a (5) box farther down the page shows you a preview of what the informal greeting will look like.
Note that the household name, informal greeting, and formal greeting convention also rely on other factors, such as how many contacts might be part of the household, how many of those contacts you might want to be listed, the order of contacts, and so on.
The Name Overrun, Name Connector, and name sequence also impact the appearance of your household names and greetings. You can customize those as well to suit your organizational preference.
(4) The Name Connector joins multiple contacts together in the name, formal name, or informal name fields. “And” is the default value, but you can also override that with another value, like “&” or “y.” There are no character restrictions on the value.
(5) The Name Overrun value is a text value that substitutes a lengthy list of names in a Household Name, Informal Greeting, or Formal Greeting. The default is “Friends.”
(6) The Contact Overrun Count is the number that indicates the maximum number of names you want to show. The default for this setting is 9. You may have nine members of a household, but you surely wouldn’t want to list out all of their names in the household name or greetings.
Also, read: Salesforce leads vs Contacts vs Opportunities – Maximize functionality
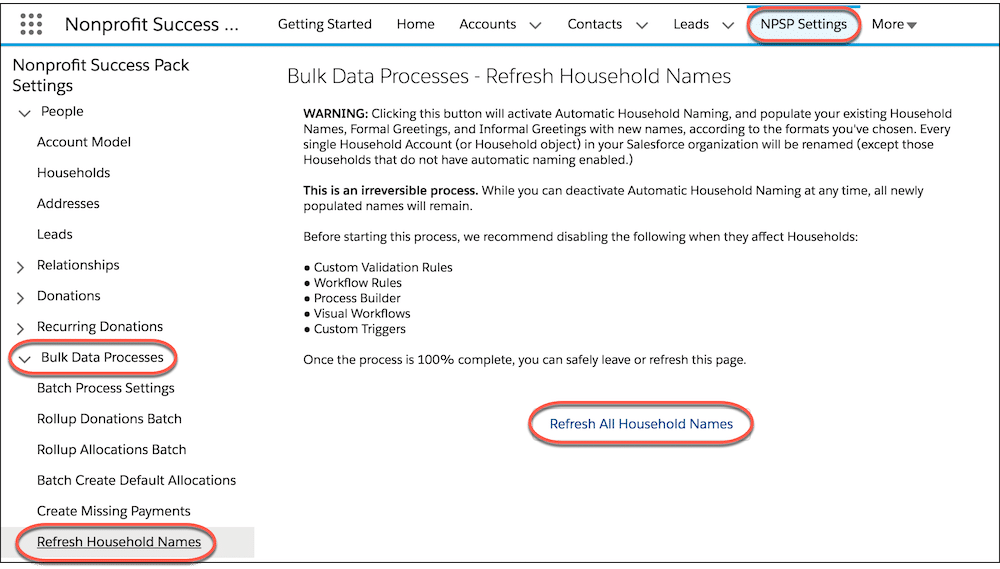
Refresh All Household Names: –
1. Click NPSP Settings, then click Bulk Data Processes > Refresh Household Names.
2. Carefully examine the WARNING section before refreshing household names.
3. Click Refresh All Household Names to start the process.
Prevent Duplicates in Nonprofit Success Pack: –
- Matching Rules – the criteria for discovering duplicate records
- Duplicate Rules – the step that is taken when a user initiates to build a potential duplicate.
Activate NPSP Matching and Duplicate Rules: –
1. Click the gear icon ( ), then click Setup.
2. Enter “duplicate” in the setup search box.
3. Click on Matching Rules.
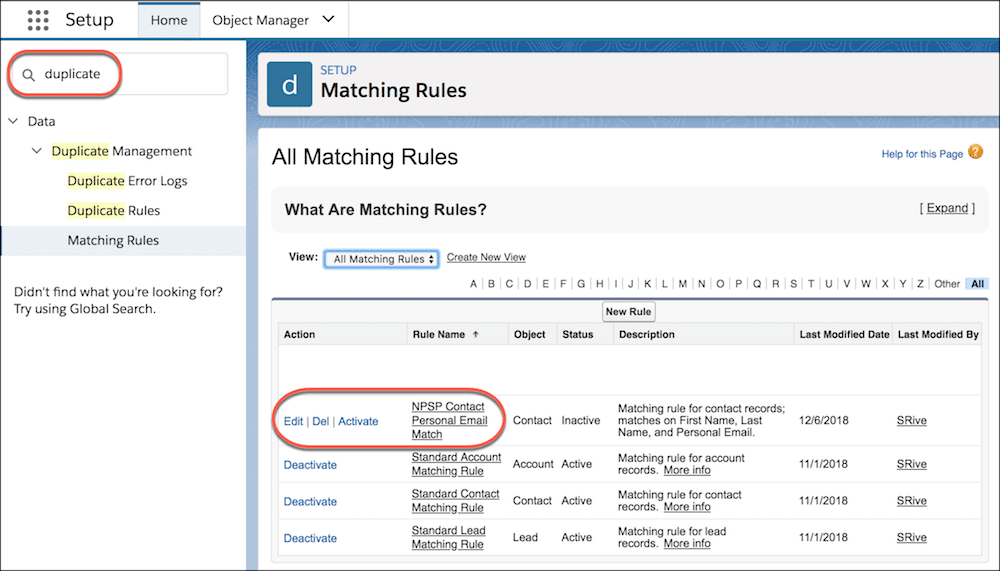
4. To review the matching criteria, click on the rule.
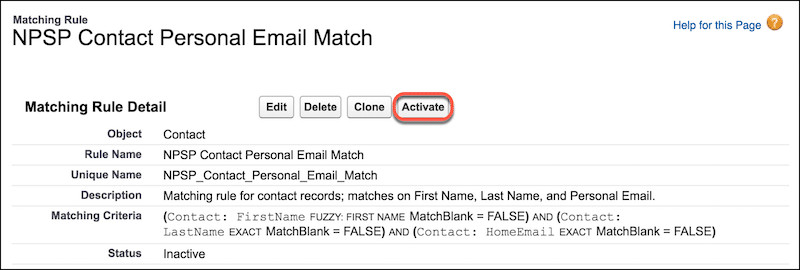
5. If this meets your needs, then click Activate to activate this matching rule.
6. Now we need to activate the duplicate rule or what happens when a user starts creating a potential duplicate contact, account, or custom record. Under Setup, you need to navigate back to the duplication management menu and click Duplicate Rules.
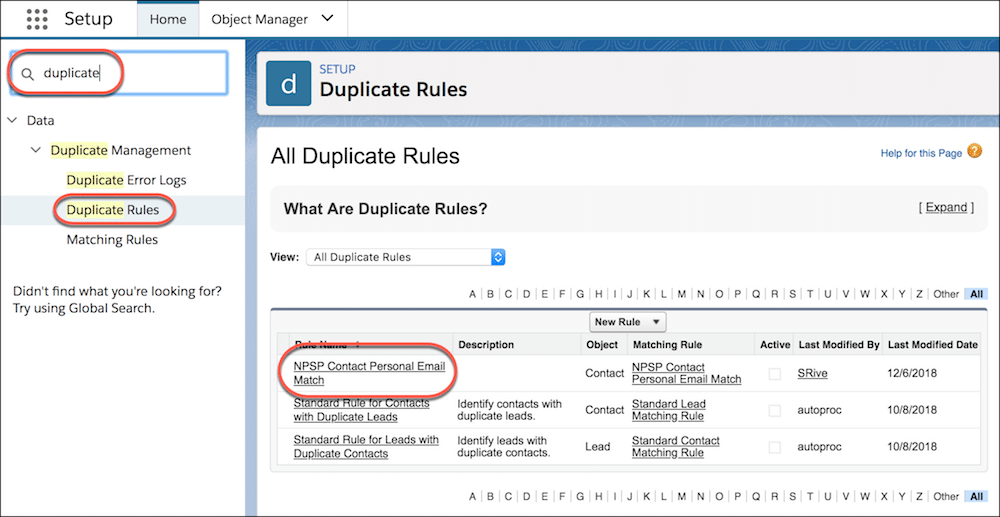
7. Then click NPSP Contact Personal Email Match.
- There are two actions you can choose when a user creates a contact that is identified as a potential duplicate. Allow them to create the contact with or without an alert or block them from creating the contact. In this case, NPSP allows your user to create the contact.
- There are two options for what can happen when Salesforce matches a duplicate using your matching rules. You can alert the user and/or send the contact to a special report. In this case, NPSP chooses to do both.
- Review the matching rules that you activated in a previous step.
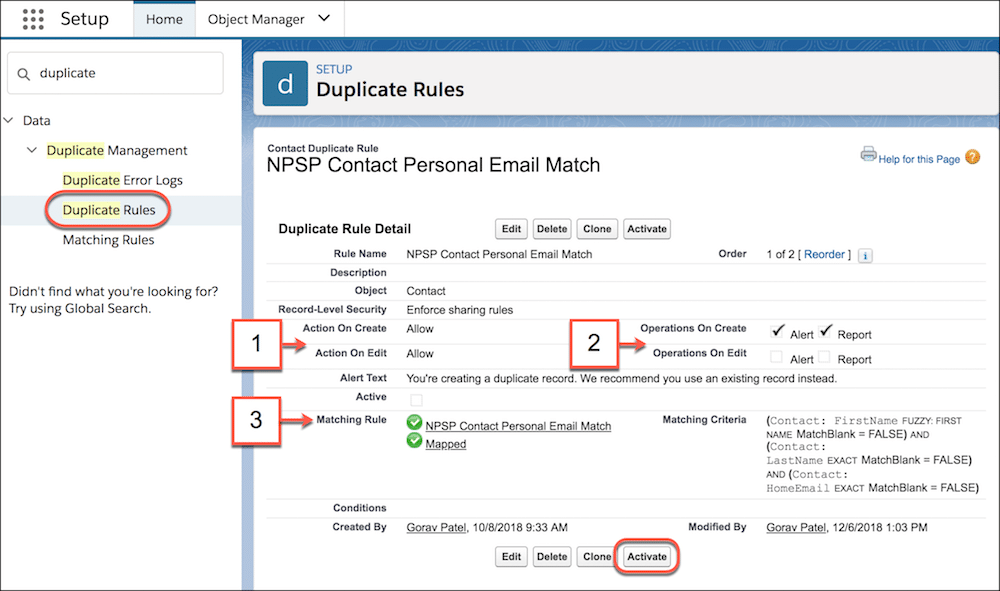
8. Click Activate.
Also, read: 16 Salesforce tips and tricks for Improving your Sales Process and Boosting Revenue
Donor System:

Create or Edit Donations: –
Nonprofit Success Pack and Donations
The Nonprofit Success Pack (NPSP) is designed to help fundraisers operate more effectively and donation management is a critical part of the process.
| Salesforce Object (Tab) | Nonprofit “Concept” |
| Accounts | Households or Organizations (like a business or foundation) |
| Contacts | Donors (also volunteers and other people) |
| Opportunities | Donations (and things like grants, including earned income and memberships) |
Add a Donation from an Individual: –
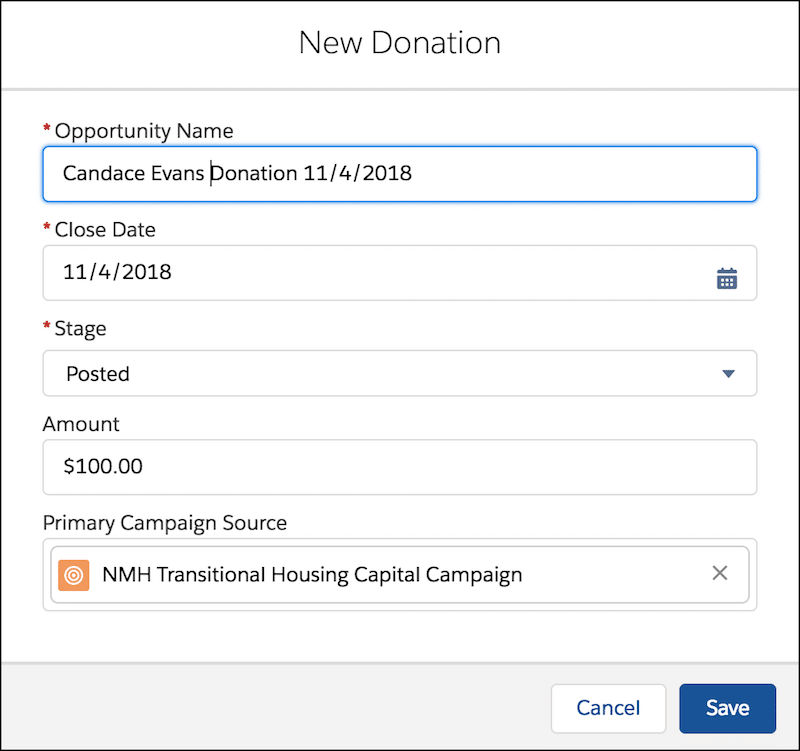
There are two methods to enter a donation in NPSP. You can either go to the Opportunity tab and click the New button or use the “New Donation” button on the Contact record.
For a simple donation, it is often easiest to just enter the donation from the contact record.
- On the Contact Record, click New Donation.

- Fill in the form fields on the opportunity record. By default: –
Add a Donation from a Company or Other Institution: –
Producing a donation from a company or other entity is almost similar to building a donation from an individual.
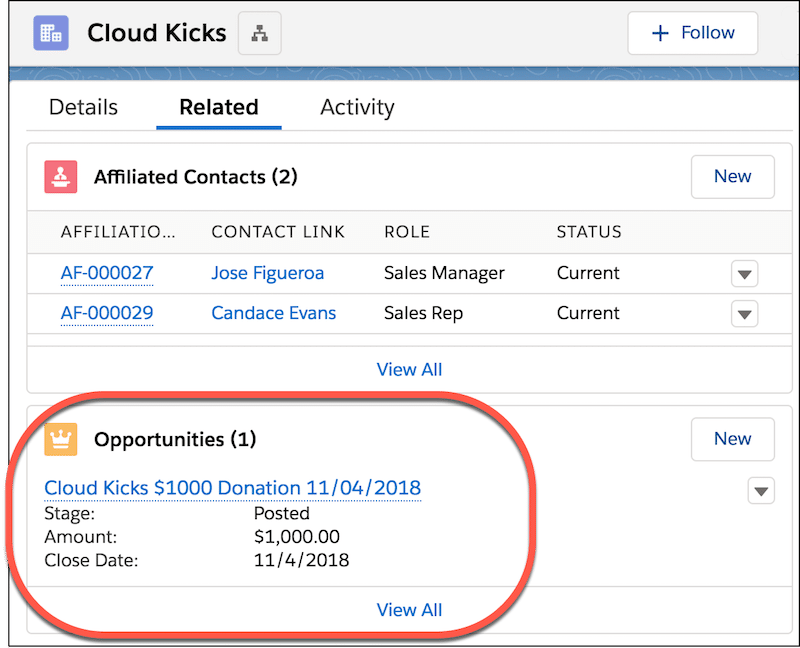
- Open the Account to which you want to associate the new donation.
- On the Organization Account record, click the Related tab.
- On the Opportunities list, click New.
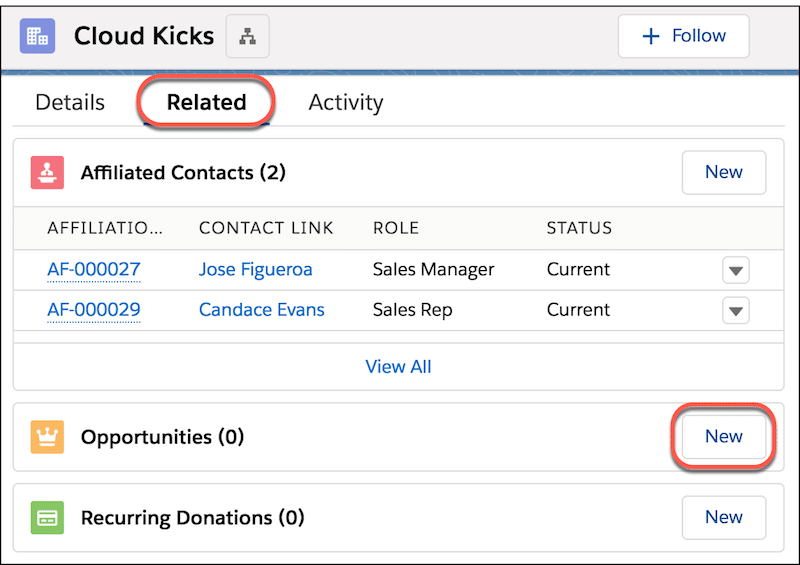
- Choose the Donation record type and click Next.
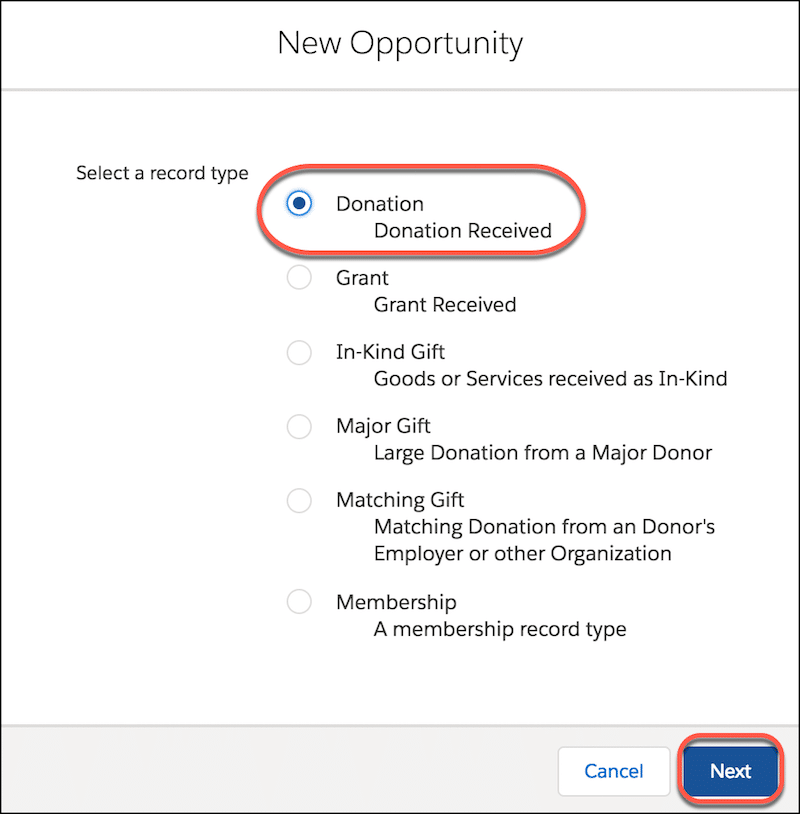
- Fill in the required fields.
- Click Save.
Also, read: Salesforce ROI calculator – know when upgrades are right for your business
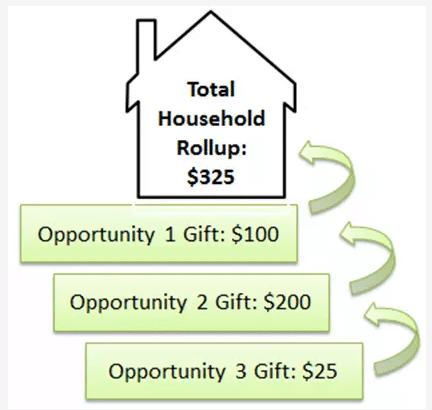
Opportunity Rollups:
Opportunity rollups show data and information from corresponding records, including aggregate totals. In other words, rollup fields let information from one record automatically “roll up” and emerge on another related record.
Create or Edit Payments: –
Payments Overview: –
Payments let you define instalment for a single opportunity, usually coming in over some time. We often use payments to track a single large pledge, or grant, where the full amount of the donation is distributed over time.
Create Payments for an Individual Donation: –
Payments let you divide a single donation over a fixed period and let you track the present and future payment amounts. Payments are especially helpful when your grant funders or major donors describe multiple payment schedules for their donations or grants.
- Make a new opportunity record for the complete amount of the pledge. In this case by making a new opportunity for $300,000 – the lump sum amount that has been pledged.
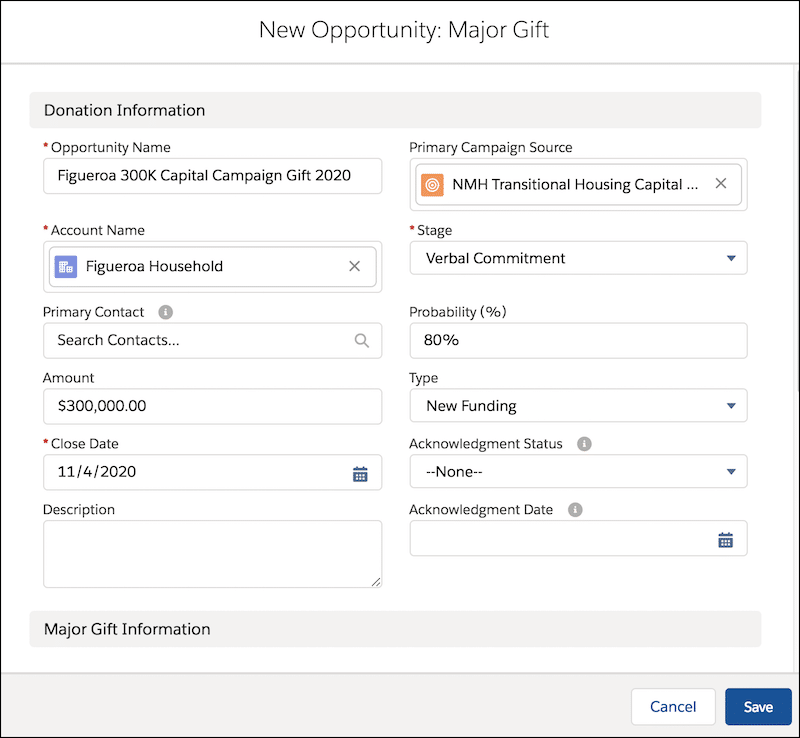
- Click Save
- Open the new opportunity record just created.
- On the Related tab, scroll down to Payments and click the Schedule Payments button.
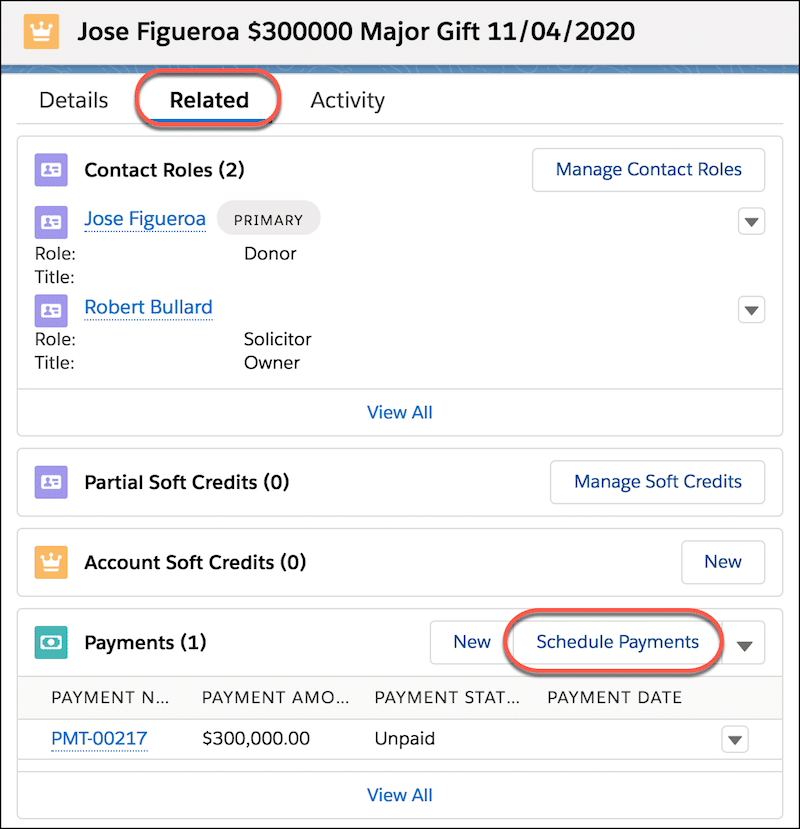
- Set the number of payments in the Create a Payment Schedule section, the starting date for the first payment, and the gap for the amount of time between payments.
Now you manage Create a Payment Schedule:
- Click Calculate Payments.

After completing this process, NPSP creates an editable list of scheduled payments:
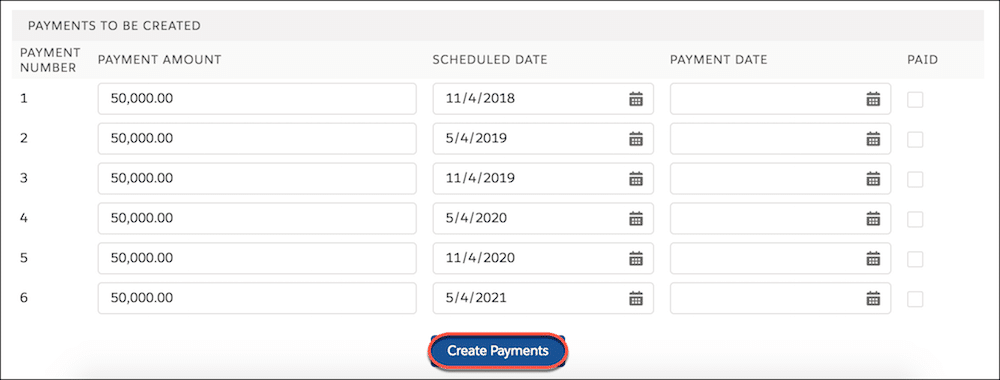
In our example, the payment calculator creates six payments with the first payment scheduled on 11/04/2018, the second one scheduled six months later (the agreed payment interval), and so on. At this point, if you require, you can alter the payment amounts and dates on the payment schedule. This is helpful, for example, when you know that the final payment will be a different amount, or if the third payment will come in on a different date.
- To save this schedule, click Create Payments.
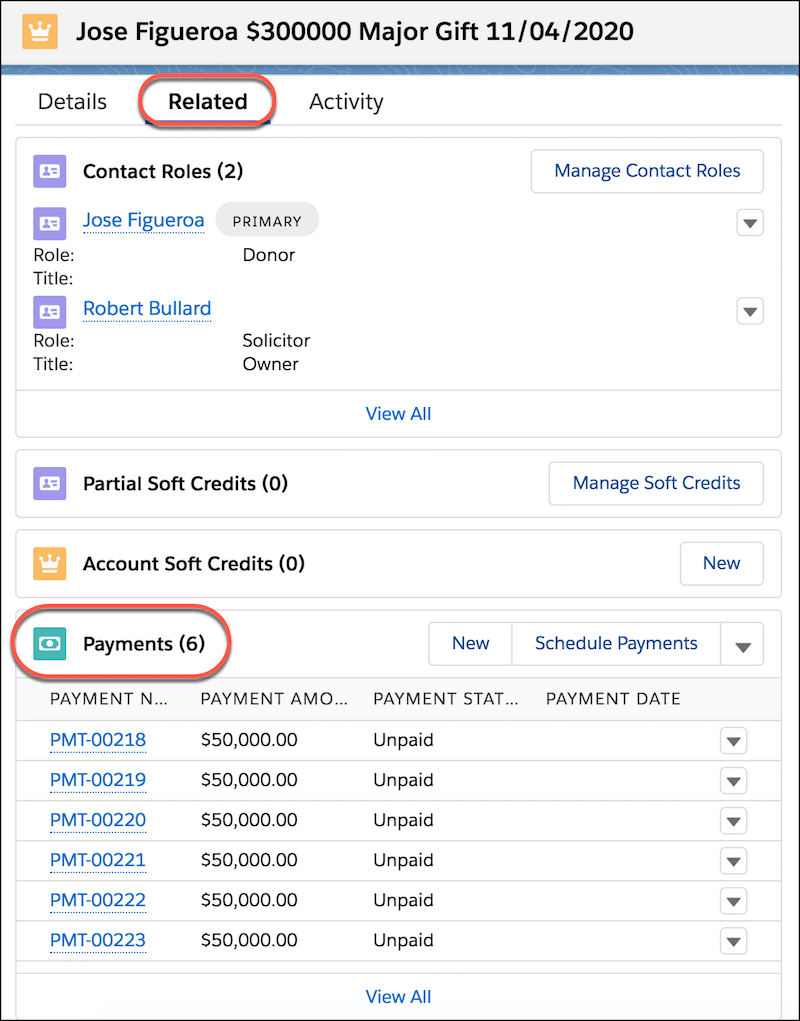
Back on the Opportunity Related tab, the Payments list shows the new payment schedule:
Also, read: The Guide to Salesforce Deployment checklist
Conclusion
The NPSP now has a unique and curious, hybrid position in the Salesforce ecosystem. The Nonprofit Success Pack comes pre-installed for new Salesforce.org customers, though you can furthermore install it at any moment into any other Salesforce instance, in about ten minutes.
Salesforce.org provides upgrades directly, AppExchange partners, consultants, nonprofit and higher-end consumers, Salesforce engineers and developers, all come together to make enhancements and modifications to the product. So, the Salesforce Nonprofit Success Pack is a significant starting point for organizations to start the configuration procedure after they have invested in the world’s leading CRM – Salesforce.
Salesforce Consulting Services
If you are new to automation and confused about Workflow or Process Builder. Need not to worry, we have got you all covered. Talk to our experts and clear all the cloudy thoughts about automation.