Microsoft Dynamics 365 Business Central is an all-in-one cloud-based business management solution that empowers customers to update from an ERP system or entry-level accounting software to one single, all-inclusive solution that maintains sales, operations, finances, and customer service. Business Central is fast & secure to implement, simple to configure and is highly adaptable with rich features. It helps businesses streamline their processes, enhance customer relations and facilitate growth.
Microsoft Dynamics 365 Business Central delivers the comprehensive power of Microsoft Dynamics NAV to the cloud. It makes it simple to connect information and financial transactions smoothly across subordinate companies and international & multi-site deployments.
Dynamics 365 Business Central – Intercompany Transaction
Microsoft Dynamics 365 Business Central has the intercompany transaction functionality which enables you to do business with your internal partner organizations and subsidiaries using the same approach that you choose when you engage with your customers and external vendors.
Various organizations today have subsidiaries or other associate companies, and multiple transactions occur between them. With the help of intercompany transactions in Microsoft Dynamics 365 Business Central, companies can track those transactions with ease. Business Central makes it extremely easier for organizations to engage and contract with one another.
These organizations can further enhance productivity, decrease errors, and post transactions across multiple subsidiary companies using the functionality of the intercompany transaction by Dynamics 365 Business Central. This function also eliminates the need to enter sales and purchase orders manually in each of the organizations where you buy and sell.
The standard Business Central solution also includes some intercompany functionality out-of-the-box, and for simple and light requirements, this standard functionality is sufficient. Here you simply need to insert intercompany transaction information just once in the relevant documents, the mapping facilities for the chart of accounts and dimensions further assure that information appears in the correct places.
Also, read: 4 Easy Steps to initiate Refund in Business Central
Basics Required to Set Up Intercompany Transactions with Dynamics 365
You can make transactions this way, like a sales journal entry created at one organization should automatically be created in another organization. To achieve this, two things need to match from one organization to the other. Then, there is a call for an agreement on common charts of accounts and the dimensions to be employed for transactions between organizations.
Intercompany Transaction in Dynamics 365 Business Central – The Complete Process
Intercompany Transaction
Having the ability to run multiple organizations is one thing but posting transactions among those entities is a different thing. With Dynamic 365 Business Central you can effortlessly and efficiently manage your intercompany transactions.
Now, before starting with the process, let us quickly understand the key benefits of using Intercompany Transaction in Dynamics 365 Business Central. There are four main benefits to the Intercompany functionality:
- Improved productivity as a result of simplified transactions and time saved in the process.
- Reduced error potential with a one-time entry of data and information along with system-wide, automatic updates.
- Comprehensive audit trail and complete visibility into transaction histories and other business activities.
- Practical, efficient, cost-effective transactions with affiliate and subsidiary companies.
Step 1) Setup Intercompany Transactions
- Search Company Information, and then choose the related link.
- On the Company Information page, fill in the Intercompany Partner Code, Intercompany Inbox Type, and Intercompany Inbox Details fields. Hover over a field to read a short description.
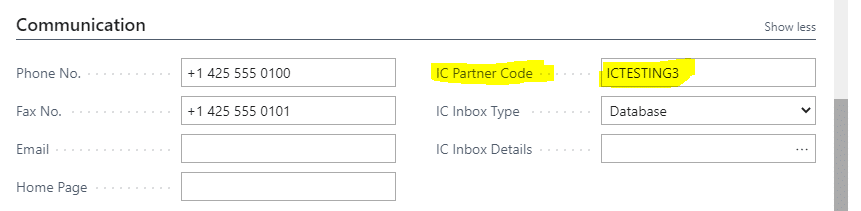
This is for Cronus named Company
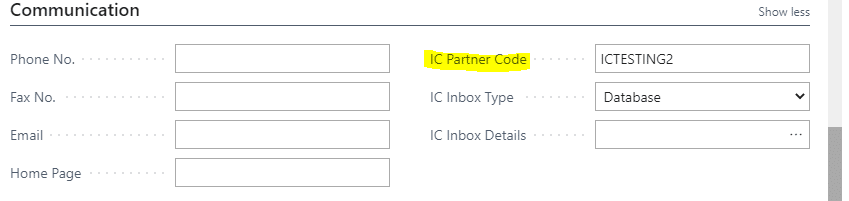
This is for Cynoteck named company
Step 2) Setup Intercompany Vendors and Customers
- Search Vendors, and then choose the related link.
- Alternatively, access the vendor from the Vendor No. field on the Intercompany Partner page.
- Open the card for a vendor that is an intercompany partner.
- In the Intercompany Partner Code field, select the relevant intercompany partner code.
- Repeat steps 1 through 4 for customers.
Also, read: Microsoft Dynamics 365 Sales Insights add-on & How to Configure
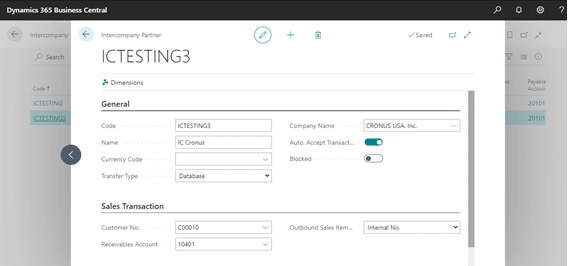
Step 3) Setup IC Partners
- Search Intercompany Partners, and then choose the related link.
- Choose the New action.
- On the Intercompany Partner page, fill in the fields as necessary. Hover over a field to read a short description.
- Fill Vendor No, Customer No. Receivable Account and Payable Account.
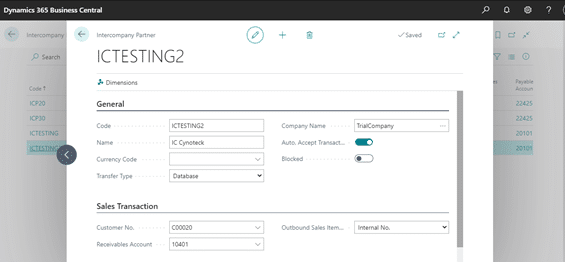
Note: This is created for Cynoteck Company from Cronus Company for IC relationship.
Note: This is created for Cronus Company from Cynoteck Company for IC relationship.
Note: For IC partner Code use the same code for a partner which code is set in Partner’s Company Information page.
Also, read: Adobe Sign for Microsoft Dynamics 365 CRM integration Guide
Step 4) Setup Chart of Accounts
- Search Intercompany Chart of Accounts, and then choose the related link.
- On the Intercompany Chart of Accounts page, enter each account on a line on the page.
- If your intercompany chart of accounts will be identical or like your regular chart of accounts, you can fill detail on the page automatically by choosing the Copy from Chart of Accounts action. You can edit the new lines as needed.

- Then Map to Acc. With Same No.
Note: Same process for another partner company. Both partners should have the same IC Chart of account No.
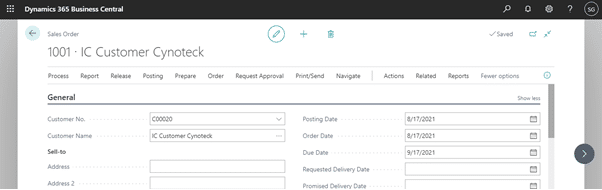
Step 5) IC Sales order
- Search Sales Orders, and then choose the related link.
- Choose New to create a new sales order.
- Fill in the fields as necessary. Hover over a field to read a short description.
- Make sure the customer is an intercompany partner.
- To send the sales order before you post it, choose the Send IC Sales Order action.
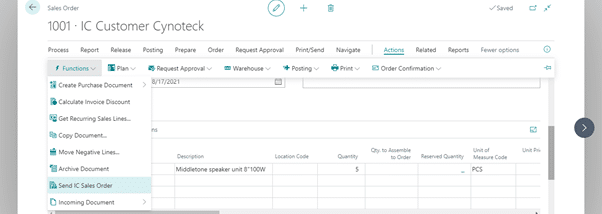
Note: Make sure that all IC partners company have the same items. Otherwise, it will create a blank PO.
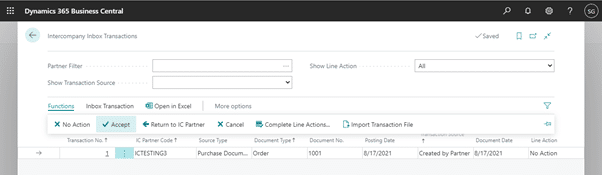
- Then Switch to the partner’s company.
If you have selected Auto transaction, then the purchase order is created automatically. If you did not select, then you have to go through the IC inbox transaction.

- Then Accept it. It will create a new purchase order.
8. Search Purchase order, then you can find the purchase order. And now you can go forward with this by posting.
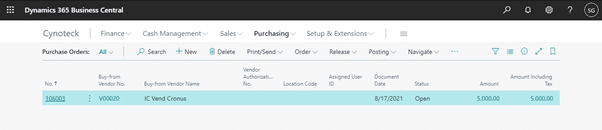
9) After posting Order
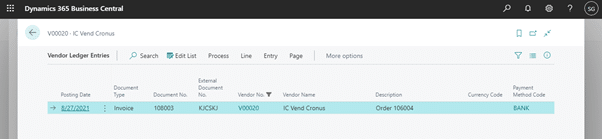
This is the ledger entry of the vendor.
Also, read: Which Microsoft Dynamics 365 Solution will Best Serve Your Business?
To Conclude – Dynamics 365 Business Central Making Intercompany Transactions Easier
With the help of Dynamics 365 Business Central, it’s simple to track intercompany transactions. Dynamics 365 enables you to improve productivity by analysing and simplifying transactions, all while reducing potential errors by eliminating the requirement for multiple line-item entries.
The Dynamics 365 Business Central Intercompany transactions functionality provides increased efficiency and boosts productivity by automating intercompany transactions in Business Central. It decreases the number of steps required to complete an intercompany transaction while simplifying the process and making it more user-friendly and clearer. It ensures that your journals are being posted to the exact sub-ledger which helps in improving communication among your sales team.
Want to learn more about how Dynamics 365 Business Central can improve your organization’s productivity and effectiveness? Contact Cynoteck today!

Microsoft Dynamics 365 Business Central
Microsoft Dynamics 365 Business Central is an all-in-one ERP business management solution that helps you connect your financials, sales, service, and operations to streamline business processes. Connect our team if you are interested in implementing Dynamics 366 business central in your business.
