
Create Add Time Label module for Magento 2
In this module, you will learn how to create a custom module to add and display the time label on the single product page, add to the cart page, view page, and admin panel.
Basically, this module is set according to the inventory stock status as per the individual products.
Starting with the module Folder Structure:
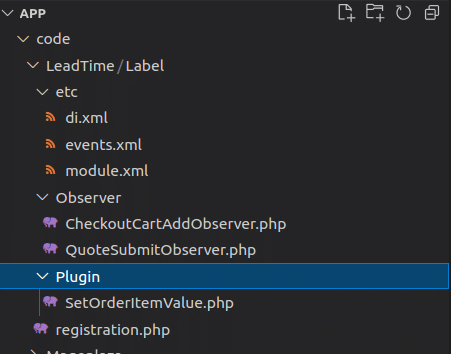
To create a custom module, you will need to complete the following steps:
Step 1: Create a folder with the name LeadTime module
The name of the module is defined as “VendorName_ModuleName”. The first part is the name of the vendor, and the last part is the name of the module:
For example – My Module Name is LeadTime_Label, focus on the following guide to create the folders:
The folder locations for modules in Magento 2: app/code folder
app/code/LeadTime/Label
Step 2: Creating a registration.php file
Create a registration.php file that registers the module with the name of the folder and subfolder of the model.
app/code/LeadTime/registration.php
Contents:
<?php
\Magento\Framework\Component\ComponentRegistrar::register(
\Magento\Framework\Component\ComponentRegistrar::MODULE,
'LeadTime_Label',
__DIR__
);
Also, read: How to add Simple & Configurable Products in Magento 2
Step 3: Creating etc/module.xml file
It is necessary to create an etc folder and add the module.xml file
app/code/LeadTime/Label/etc/module.xml
Contents:
<?xml version="1.0"?>

<config xmlns:xsi="http://www.w3.org/2001/XMLSchema-instance" xsi:noNamespaceSchemaLocation="urn:magento:framework:Module/etc/module.xsd">
<module name="LeadTime_Label" setup_version="1.0.0">
</module>
</config>
Step 4: Creating of etc/events.xml file
Events are performed by the module when certain actions are triggered. Magento allows us to create our own events that can be sent in code. When an event is dispatched, it can pass data to any observer configured to watch for that event.
In this event file we are triggering two events; one event is being called after the product is being added for the checkout cart, the module calls CheckoutCartAddObserver Observer, and the second event before quote submit which calls QuoteSubmitObserver Observer.
app/code/LeadTime/Label/etc/event.xml
Contents:
<?xml version="1.0"?>
<config xmlns:xsi="http://www.w3.org/2001/XMLSchema-instance" xsi:noNamespaceSchemaLocation="urn:magento:framework:Event/etc/events.xsd">
<event name="checkout_cart_product_add_after">
<observer name="extension_checkout_cart_product_add_after" instance="LeadTime\Label\Observer\CheckoutCartAddObserver" />
</event>
<event name="sales_model_service_quote_submit_before">
<observer name="unique_name" instance="LeadTime\Label\Observer\QuoteSubmitObserver" />
</event>
</config>
Also, read: 4 Effective ways Small Businesses Can Optimize in Magento 2 Store
Step 5: Creating Observer/CheckoutCartAddObserver.php file
These observers are a Magento class which can affect the performance of any business logic. The Observer is executed when the events configured to watch them are dispatched by the event manager.
At first, we will create a folder named Observer in the module root.
After that, we will create a PHP file for the first event which we have given the name of the observer in the event file.
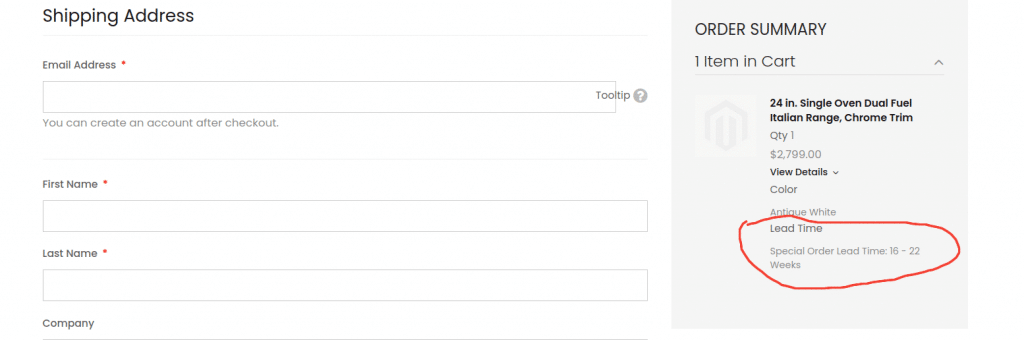
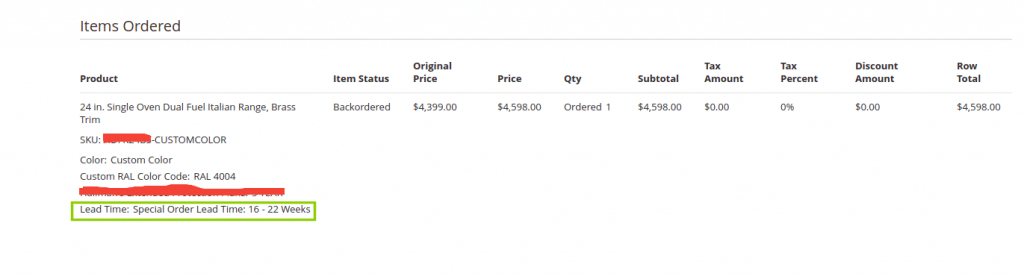
In the CheckoutCartAddObserver file, we check product quantity if quantity is more than zero then set label ‘Product Instock Lead Time: 7 -21 days‘, if quantity is zero or less than zero then set label ‘Special Order Lead Time: 16 – 22 Weeks‘
app/code/LeadTime/Label/Observer/CheckoutCartAddObserver.php
Contents:
<?php
namespace LeadTime\Label\Observer;

use Magento\Framework\Event\Observer as EventObserver;
use Magento\Framework\Event\ObserverInterface;
use Magento\Store\Model\StoreManagerInterface;
use Magento\Framework\View\LayoutInterface;
use Magento\Framework\App\RequestInterface;
use Magento\Framework\Serialize\SerializerInterface;

class CheckoutCartAddObserver implements ObserverInterface
{
protected $request;
private $serializer;
protected $layout;
protected $storeManager;
public function __construct(RequestInterface $request, SerializerInterface $serializer, StoreManagerInterface $storeManager, LayoutInterface $layout)
{
$this->_request = $request;
$this->serializer = $serializer;
$this->layout = $layout;
$this->storeManager = $storeManager;
}
public function execute(\Magento\Framework\Event\Observer $observer){
$item = $observer->getQuoteItem();
$additionalOptions = array();
$product = $observer->getProduct();
$productId=$product->getId();
$objectManager = \Magento\Framework\App\ObjectManager::getInstance();
$StockState = $objectManager->get('\Magento\CatalogInventory\Api\StockStateInterface');
$qty=$StockState->getStockQty($product->getId(), $product->getStore()->getWebsiteId());
if($qty > 0){
$label='Product Instock Lead Time: 7 -21 days' ;
}else{
$label='Special Order Lead Time: 16 - 22 Weeks' ;
}
if ($additionalOption = $item->getOptionByCode('additional_options')) {
$additionalOptions = $this->serializer->unserialize($additionalOption->getValue());
}
$additionalOptions[] = [
'label' => 'Lead Time',
'value' => $label
];
if (!is_null($additionalOptions)) {
$item->addOption(array(
'product_id' => $item->getProductId(),
'code' => 'additional_options',
'value' => $this->serializer->serialize($additionalOptions)
));
}
}
}
Step 6: Creating Observer/QuoteSubmitObserver.php file
In this file, we will inherit ObserverInterface class. And will get the product quote, order value, and set it in the choice of an additional options.
app/code/LeadTime/Label/Observer/QuoteSubmitObserver.php
<?php
namespace LeadTime\Label\Observer;
use Magento\Framework\Event\ObserverInterface;
use Magento\Framework\Serialize\SerializerInterface;
class QuoteSubmitObserver implements ObserverInterface
{
private $serializer;
public function __construct(SerializerInterface $serializer)
{
$this->serializer = $serializer;
}
public function execute(\Magento\Framework\Event\Observer $observer)
{
try {
$quote = $observer->getQuote();
$order = $observer->getOrder();
$quoteItems = [];

// Map Quote Item with Quote Item Id
foreach ($quote->getAllItems() as $quoteItem) {
$quoteItems[$quoteItem->getId()] = $quoteItem;
}

foreach ($order->getAllVisibleItems() as $orderItem) {
$quoteItemId = $orderItem->getQuoteItemId();
$quoteItem = $quoteItems[$quoteItemId];
$additionalOptions = $quoteItem->getOptionByCode('additional_options');

if (!is_null($additionalOptions)) {
// Get Order Item's other options
$options = $orderItem->getProductOptions();
// Set additional options to Order Item
$options['additional_options'] = $this->serializer->unserialize($additionalOptions->getValue());
$orderItem->setProductOptions($options);
}
}
} catch (\Exception $e) {
// catch error if any
}
}
}
Also, read: Must use Magento 2 extension for additional functionality
Step 7: Creating etc/di.xml file
We create the di.xml file inside the etc folder. Configures the dependencies are injected by the object manager. Also, specify sensitive configuration settings using this file. We configure our custom plugin to set order labels in this particular file on the admin panel.
Step 8: Create Plugin/SetOrderItemValue.php file
We create a folder in a module root with a plugin name, then inside it, we create a Php file named SetOrderItemValue.php which sets our label to our order.
<?php
namespace LeadTime\Label\Plugin;
use Magento\Framework\Serialize\SerializerInterface;
class SetOrderItemValue
{
private $serializer;
public function __construct(SerializerInterface $serializer)
{
$this->serializer = $serializer;
}
public function aroundConvert(\Magento\Quote\Model\Quote\Item\ToOrderItem $subject, callable $proceed, $quoteItem, $data)
{

// get order item
$orderItem = $proceed($quoteItem, $data);

if(!$orderItem->getParentItemId() && $orderItem->getProductType() == \Magento\Catalog\Model\Product\Type::TYPE_SIMPLE){
if ($additionalOptionsQuote = $quoteItem->getOptionByCode('additional_options')) {
//To do
// - check to make sure element are not added twice
// - $additionalOptionsQuote - may not be an array
if($additionalOptionsOrder = $orderItem->getProductOptionByCode('additional_options')){
$additionalOptions = array_merge($additionalOptionsQuote, $additionalOptionsOrder);
}
else{
$additionalOptions = $additionalOptionsQuote;
}
if(!is_null($additionalOptions)){
$options = $orderItem->getProductOptions();
$options['additional_options'] = $this->serializer->unserialize($additionalOptions->getValue());
$orderItem->setProductOptions($options);
}
}
}

return $orderItem;
}
}
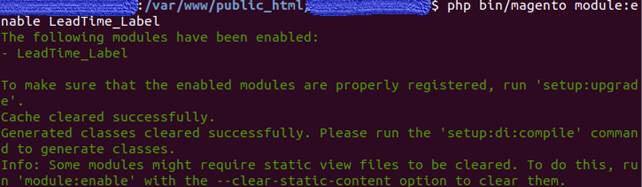
Step 9: Enabling the module
After creating the module run the following command:
php bin/magento module:status
shows the list of disabled modules: LeadTime_Label my module.
enable the module right now, let run the command as:
php bin/magento module:enable LeadTime_Label
Also, read: 7 Steps to Install Magento 2 in Windows OS with XAMPP
Step 10: After enabling the module Run Magento commands:
php bin/magento setup:upgrade
php bin/magento setup:static-content:deploy -f
php bin/magento c:c
php bin/magento c:f
chmod -R 777 generated/ var/ pub/
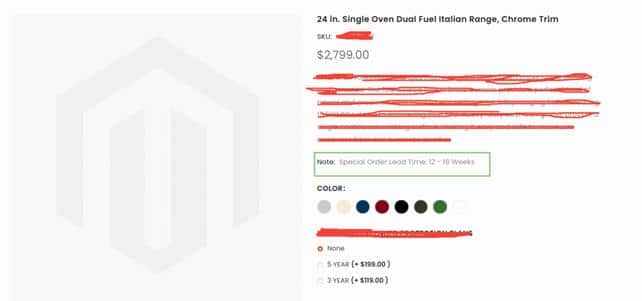
Web Site Product Page, Ad Cart Page & Check Out Page After Installing:

Hope you find this blog helpful in understanding the flow of how any module can be created on Magento to enhance the functionality for products.
Web Development Services
Are you looking for a reliable web development company? Our highly skilled web developers enables us to deliver result oriented web development services. Contact our team to understand, how we can help you in achieving your business goals.


Hi, thanks for the lesson. The content of the di.xml file would have been appreciated for a better comprehension of your article. Regards