“Nothing can withstand the power of the human will if it is willing to stake its very existence to the extent of its purpose.” - Benjamin Disraeli. I am Rashmi Kaushik, working as a blogger, Software Consultant and Subject Matter Expert in Cynoteck Technology Solutions Ltd.. Although, I did my graduation and post graduation in Read More
We are Microsoft Gold partner with its presence across the United States and India. We are a dynamic and professional IT services provider that serves enterprises and startups, helping them meet the challenges of the global economy. We offer services in the area of CRM Consultation and implementation, Application development, Mobile application development, Web development & Offshore Development.
Add Custom Button Using Command bar in Dynamics 365 PowerApps
The ribbon is displayed in the .NET application in Microsoft Dynamics 365 for certain forms and it had been used for list views in Dynamics 365 for Outlook. Both - the ribbon and the command bar use the same underlying XML data to specify what commands to show, when the commands are enabled, and what the commands accomplish.
Following these steps below you can easily work with the Ribbon Button:
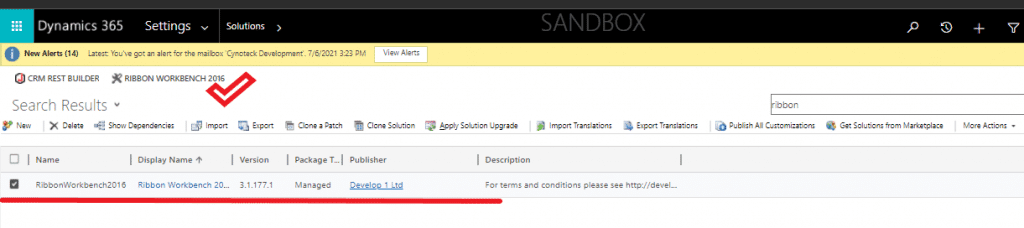
Download and install Ribbon Workbench.
Choose a suitable Icon for your button.
Create a solution.
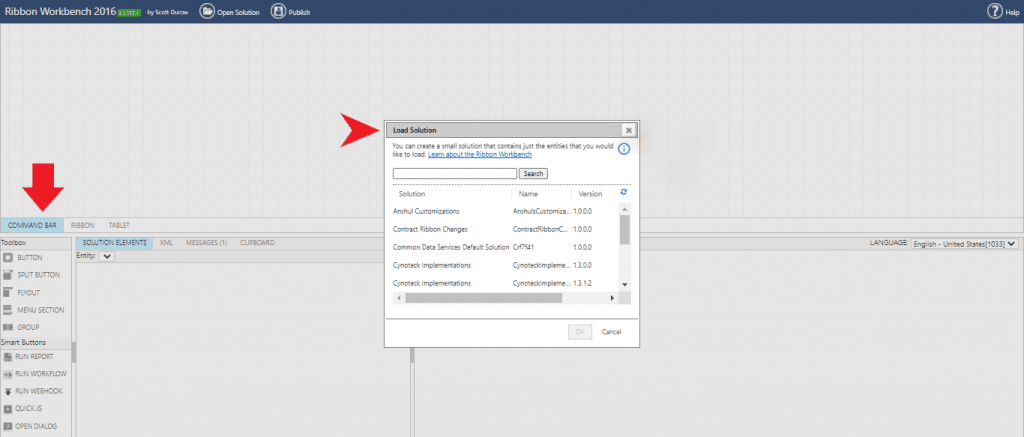
Edit the button in Ribbon Workbench.
Publish and test.
After the new update of dynamics 365 in 2021 wave2, there is a very interesting and advanced feature to customize a button on your specific entity.
Now we will see the Life cycle of creating a custom button-through model-driven app in the following steps:
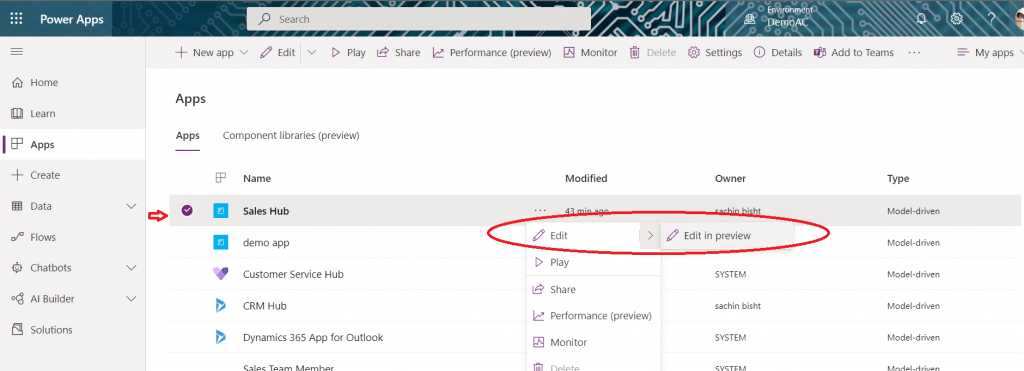
These updates of Dynamics 365 allow you to customize your module easily. This will take less time and show more results. For using this feature, navigate to https://make.powerapps.com/, then select your environment & navigate to the app button, choose your module, and start playing with that.
2. Here as you see the new feature- ‘Edit in preview’, this new feature is very advanced and fast. Here you can make changes in your module (Entity & their forms) in a very short time. Here you don’t need to publish all customization and refreshing this will work dynamically after clicking on the ‘Save & Publish’ button.
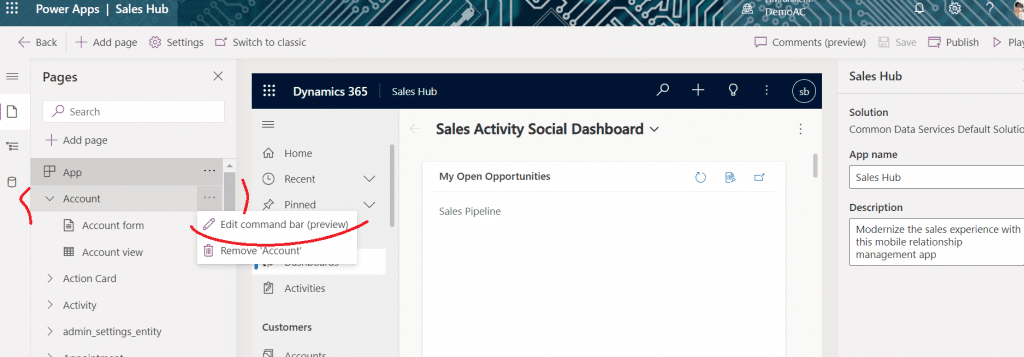
3. As you can see when you navigate the ‘Edit in preview’ button you will see this interface, there are so many advanced options that will customize your module. Dynamics 365 presents this update in a very easy and simple way.
After clicking on ‘Edit command bar (preview)’, you have to select the main form, for adding the custom button.
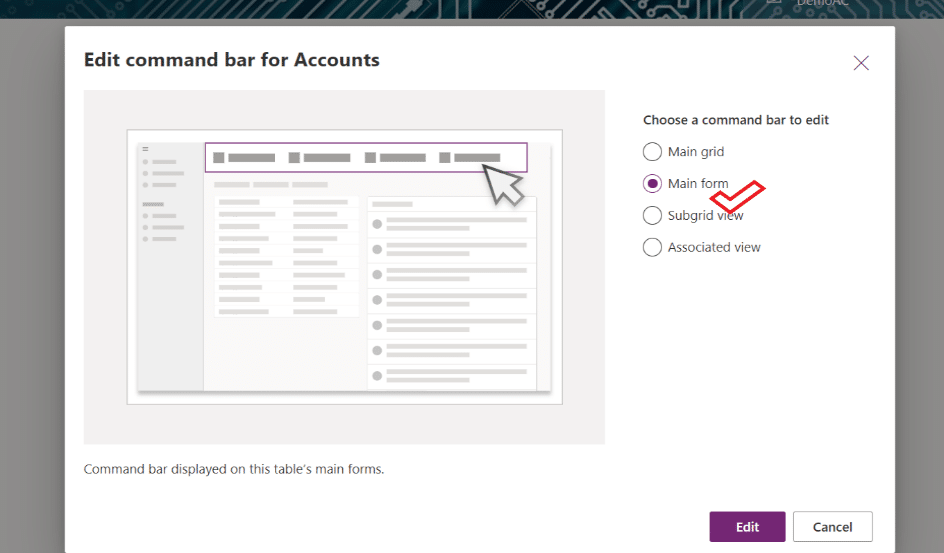
4. This Edit button page will navigate you to on this page:
In the picture shown above, you can see there are a lot of features and functions. The ‘New command OR New button’ allows adding a custom button. Here are many options to add with the button, the features are defined below:
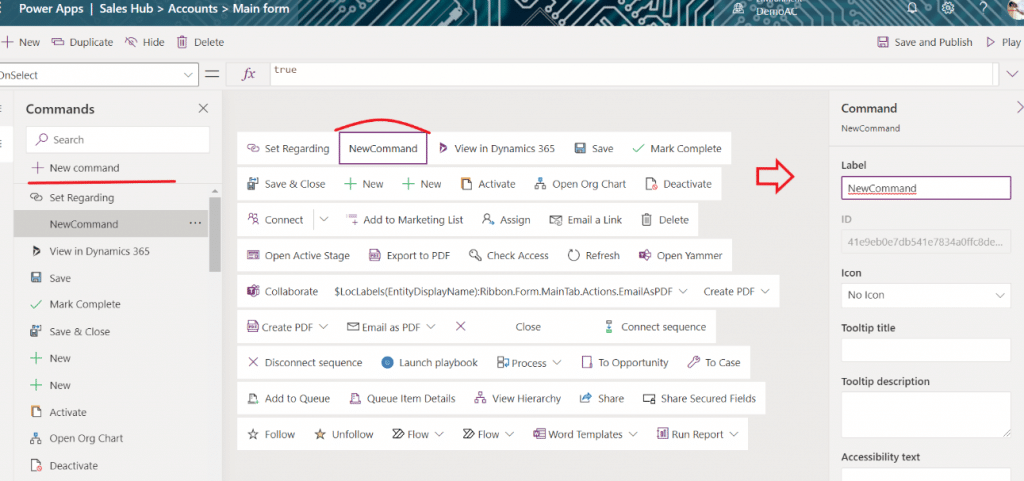
Button Icon (Default icons and Icons through web resource)
Tooltip tittle for button
Tooltip description
Accessibility text
Order number (location of a button)
Action (A. Run through formula, B. Run through JavaScript)
Visibility (Based on the formula OR always)
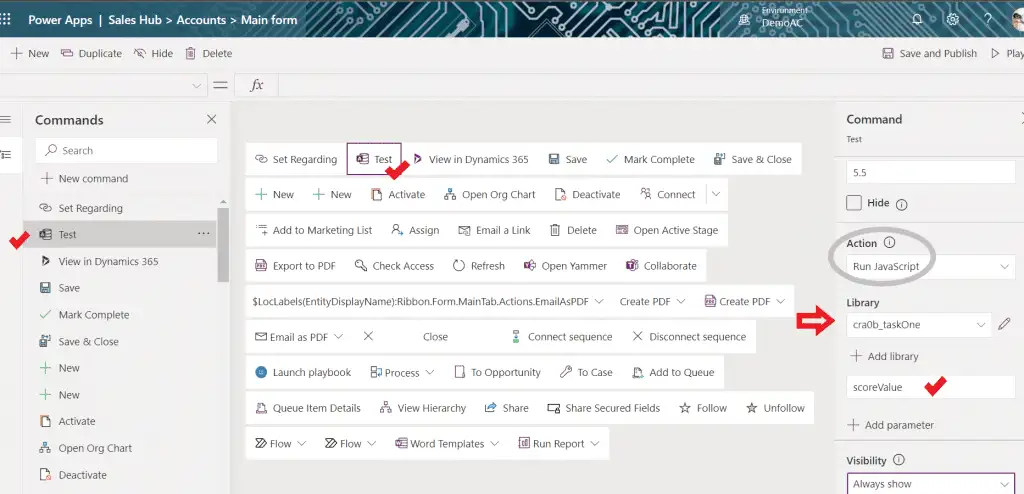
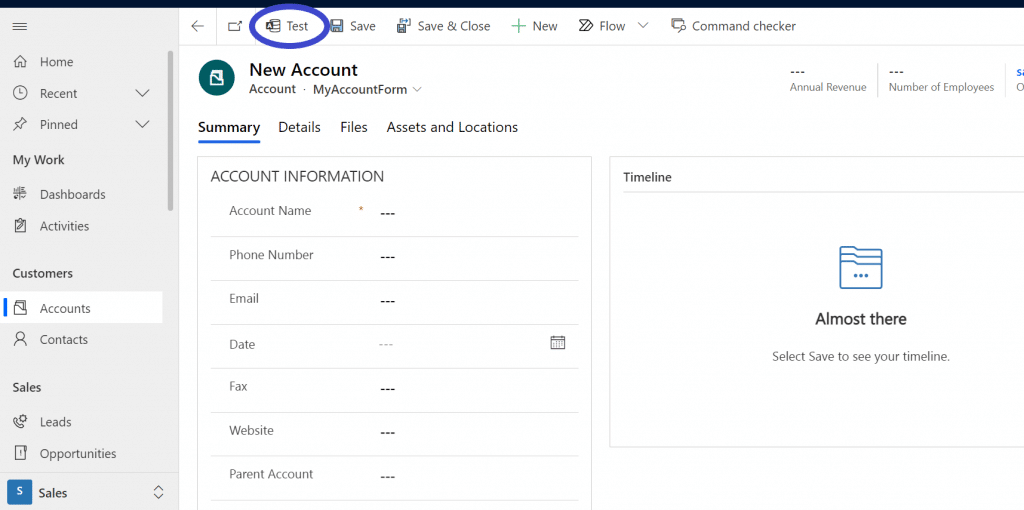
6. In the above picture you can see a Test button, with this button you can use JavaScript (it is optional, you can also use the formula) and you can give that a default logo, you can give it the logo through web resource. You can also change the position of the button like if you want my button should come after the saving button, for this you just need to drag and drop that, and it will navigate there.
Here you just add the required functionality according to the need and Save & Publish the button.
7. In the final step, you can see the custom button in Dynamics 365, after just following the above steps. It is so interesting you will love playing with it, using different features of the same.
This new update is so advanced than the previous one. The new update is timesaving while the previous one was so complicated and time-consuming; the new features include a lot of advanced things which the previous one lacked. So, explore the new features of this update of dynamics 365 wave - 2 and get the desired results that you wish for.
The ribbon is displayed in the .NET application in Microsoft Dynamics 365 for certain forms and it had been used for list views in Dynamics 365 for Outlook. Both – the ribbon and the command bar use the same underlying XML data to specify what commands to show, when the commands are enabled, and what the commands accomplish.
Following these steps below you can easily work with the Ribbon Button:
Download and install Ribbon Workbench.
Choose a suitable Icon for your button.
Create a solution.
Edit the button in Ribbon Workbench.
Publish and test.
After the new update of dynamics 365 in 2021 wave2, there is a very interesting and advanced feature to customize a button on your specific entity.
Now we will see the Life cycle of creating a custom button-through model-driven app in the following steps:
These updates of Dynamics 365 allow you to customize your module easily. This will take less time and show more results. For using this feature, navigate to https://make.powerapps.com/, then select your environment & navigate to the app button, choose your module, and start playing with that.
2. Here as you see the new feature- ‘Edit in preview’, this new feature is very advanced and fast. Here you can make changes in your module (Entity & their forms) in a very short time. Here you don’t need to publish all customization and refreshing this will work dynamically after clicking on the ‘Save & Publish’ button.
3. As you can see when you navigate the ‘Edit in preview’ button you will see this interface, there are so many advanced options that will customize your module. Dynamics 365 presents this update in a very easy and simple way.
After clicking on ‘Edit command bar (preview)’, you have to select the main form, for adding the custom button.
4. This Edit button page will navigate you to on this page:
In the picture shown above, you can see there are a lot of features and functions. The ‘New command OR New button’ allows adding a custom button. Here are many options to add with the button, the features are defined below:
Button Icon (Default icons and Icons through web resource)
Tooltip tittle for button
Tooltip description
Accessibility text
Order number (location of a button)
Action (A. Run through formula, B. Run through JavaScript)
Visibility (Based on the formula OR always)
6. In the above picture you can see a Test button, with this button you can use JavaScript (it is optional, you can also use the formula) and you can give that a default logo, you can give it the logo through web resource. You can also change the position of the button like if you want my button should come after the saving button, for this you just need to drag and drop that, and it will navigate there.
Here you just add the required functionality according to the need and Save & Publish the button.
7. In the final step, you can see the custom button in Dynamics 365, after just following the above steps. It is so interesting you will love playing with it, using different features of the same.
This new update is so advanced than the previous one. The new update is timesaving while the previous one was so complicated and time-consuming; the new features include a lot of advanced things which the previous one lacked. So, explore the new features of this update of dynamics 365 wave – 2 and get the desired results that you wish for.