Most of the time you work on any e-commerce application or any type of ERP, you need to import-export excel files for the data. This is a very common functionality in any web application. If for any e-commerce application, you want to add bulk products at the same time, the manual entry of these products and their appropriate data will take a long time to insert into the database.
Also, on the other hand, if you need to download any report like weekly/daily/monthly sales report, then you can export data to excel.
Laravel Excel is developed as being a Laravel-flavoured Php spreadsheet, it is a manageable and smart wrapper around Php Spreadsheet to streamline imports and exports. Laravel Excel has the following characteristics:
- Effortlessly export collections to Excel.
- Export queries with automatic chunking for more satisfactory performance.
- Queue exports for better performance.
- Smoothly export Blade views to Excel.
- Efficiently import to collections.
- Read the Excel file in fragments.
- Manage the import inserts in batches.
There are times when we need our data as hardcopy or in more user-friendly formats one of which is an excel worksheet, and it also helps full to upload a large data into the database through CSV format.
So, in this blog, we will share with you how to import-export excel file to the database in Laravel 8 and will help you to create your own import/export functionality in Laravel.
First, you need to set up Laravel 8 on your system, which you can get here (link to the post).
So, after you have the Laravel setup, you have to follow the below steps:
Step 1: Install Laravel Excel Package
Install Laravel Excel package, which you can simply do with the below composer command:
composer require maatwebsite/excel
Step 2. Register above package service in Providers and Alias for that you have to go root/config directory and open app.php file, paste the below lines into the file in provider and aliases section:
'providers' => [

        Maatwebsite\Excel\ExcelServiceProvider::class,
        /*
    ],

    'aliases' => [

        'Excel' => Maatwebsite\Excel\Facades\Excel::class,
    ],
Step 3: Install the Laravel excel package by running the artisan vendor publish command:
php artisan vendor:publish –provider=”Maatwebsite\Excel\ExcelServiceProvider”
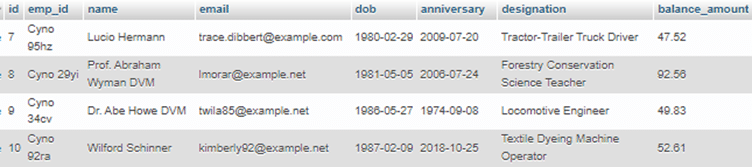
Step 4: Now you need a DB table from which you want to import or export your data, we will explain with my already existing table ‘employees’.
Now will create an import and export class for the excel package. First, we will create an import class using artisan.
Php artisan make: import EmployeeImport –model=Emolyee
The above command will create an EmployeeImport.php file inside the app/imports/ directory which will look something like this:

Create an export class using: PHP artisan make: export EmployeeExport –model=Employee
After this the export class will be created in: app/Exports/EmployeeExport.php which will look something like this:
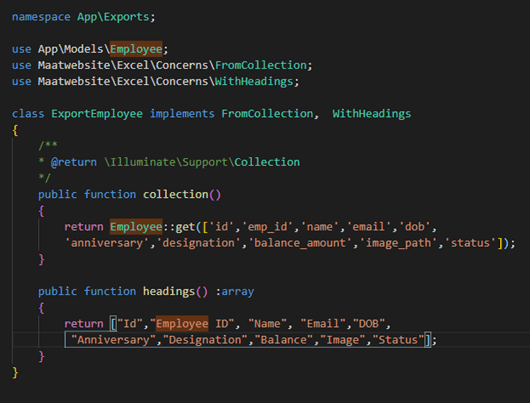
Here we have used an additional class from Maatwebsite\Excel that is WithHeadings, which will allow you to export an excel file with headings which we have defined inside the headings() method of WithHeadings class, there are a lot of other classes which you can find in Maatwebsite\Excel\Concerns folder.
Also, read: CSS GRID Vs FLEXBOX, Choose between Grid and Flex
Step 5: Create a route for import-export
Route::get('file-import-export', [EmployeesController::class, 'fileImportExport'])->name('file-import-export');
Route::post('file-import', [EmployeesController::class, 'fileImport'])->name('file-import');
Route::get('file-export', [EmployeesController::class, 'fileExport'])->name('file-export');
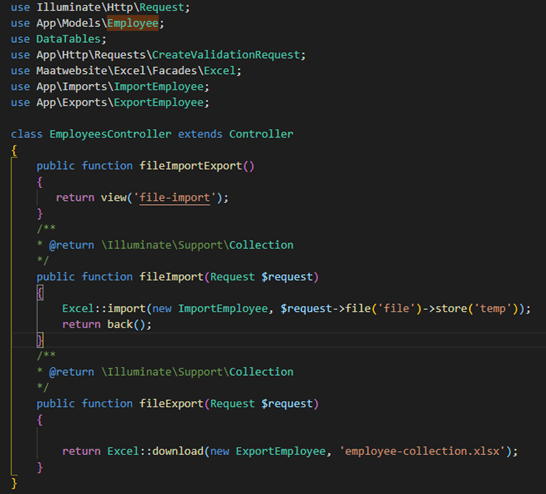
Step 6: Add Controller functions in EmployeesController:
public function fileImportExport()
    {
       return view('file-import');
    }

    /**
    * @return \Illuminate\Support\Collection
    */
    public function fileImport(Request $request)
    {
        Excel::import(new ImportEmployee, $request->file('file')->store('temp'));
        return back();
    }

    /**
    * @return \Illuminate\Support\Collection
    */
    public function fileExport(Request $request)
    {
        return Excel::download(new ExportEmployee, 'employee-collection.xlsx');
    }
And your controller file will look something like this:
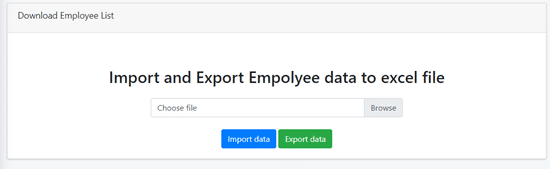
Step 7: The next step will be creating view for file importing: Let us name it “file-import.blade.php”.
Add the below code to the view file:
<form action="{{ route('file-import') }}" method="POST" enctype="multipart/form-data">
  @csrf
    <div class="form-group mb-4" style="max-width: 500px; margin: 0 auto;">
         <div class="custom-file text-left">
         	<input type="file" name="file" class="custom-file-input" id="customFile">
         	<label class="custom-file-label" for="customFile">Choose file</label>
         </div>
   </div>
          <button class="btn btn-primary">Import data</button>
         <a class="btn btn-success" href="{{ route('file-export') }}">Export data</a>
 </form>
Step 8: Final step will be to run “php artisan serve” command and use the url ‘/file-import-export’
Also, read: 7 Reasons to treat web application architecture seriously
Conclusion
Ultimately, we have now completed the functionality of export and import of Excel files in Laravel 8. This is quite simple to make a download with the excel file. For importing the data utilizing the excel sheet, it is uncomplicated to import and extract the rows.
After extracting the rows, you need to insert them into the database table. So, that’s it for this import-export excel tutorial in Laravel. You can also use the Laravel-excel package to easily create other file formats such as tsv, xlsx, pdf, etc. export or import features in Laravel 8.

Mobile App Development Services
Do you want to leverage mobile technology for your business? Cynoteck is a one-stop Mobile app Development Services provider. We provide iOS and Android application development services so that you can reach your target audience on any device.