
Everything you need to know
A connector is a proxy or a wrapper around an API that allows the underlying service to integrate with Microsoft Power Automate, Microsoft Power Apps, and Azure Logic Apps. The connector provides a way for users to connect their accounts and leverage a set of pre-built actions and triggers to build their apps and workflows.
Components
There are two types of Connector components
1. Actions:
Actions are changes performed by a user. For example: use an action to perform Add, Update, Delete & Find data in any entity such as SQL Server.
2. Triggers:
Most of the connectors provide triggers that can notify the app when specific events occur.
There are two types of triggers:
- Polling Triggers: These triggers call your service at a specified frequency to check for new data. When new data is available, it causes a new run of your workflow instance with the data as input.
- Push Triggers: These triggers listen for data on an endpoint, that is, they wait for an event to occur. The occurrence of this event causes a new run of your workflow instance.
Using Connectors
Connectors are available for use within multiple products.
Power Automate (Microsoft Flow)
Work smarter by building workflows and automating processes across your apps and services. Streamline notifications, sync data between systems, automate approval, and more.
Power Apps
Power Apps enables users to build cloud-connected and cross-platform business apps using clicks and minimal code. Create rich user experiences across the web, phones, and tablets. Assemble forms, add business logic, and take advantage of device capabilities with full creative freedom.
Logic Apps
Logic Apps is the workflow engine for Power Automate. It enables pro-developers to visually create or programmatically configure workflows in Azure. A connector in Logic Apps enables users to automate EAI, Business to business (B2B), and Business to consumer (B2C) scenarios while reaping the benefits of source control, testing, support, and operations.
Custom connectors
We offer a wide variety of connectors, but sometimes you might want to call APIs, services, and systems that aren’t available as prebuilt connectors. To support more tailored scenarios, you can build custom connectors with their triggers and actions. These connectors are function-based – data is returned based on calling specific functions in the underlying service.
Also, read: The Difference Between Power Apps and Traditional App Development
Use Office 365 Outlook Connector into Canvas App
Microsoft Office 365 is a cloud-based service that is designed to help meet your organization’s needs for robust security, reliability, and user productivity.
Available & Deprecated Actions:
| Create contact (V2) | This operation creates a new contact in a contacts folder. |
| Create contact [DEPRECATED] | This action has been deprecated. Please use Create contact (V2) instead. |
| Create an event (V1) [DEPRECATED] | This action has been deprecated. Please use Create event (V4) instead. |
| Create an event (V2) [DEPRECATED] | This action has been deprecated. Please use Create event (V4) instead. |
| Create an event (V3) [DEPRECATED] | This action has been deprecated. Please use Create event (V4) instead. |
| Create an event (V4) | This operation creates a new event in a calendar. |
| Delete contact (V2) | This operation deletes a contact from a contacts folder. |
| Delete contact [DEPRECATED] | This action has been deprecated. Please use Delete contact (V2) instead. |
| Delete email (V2) | This operation deletes an email by id. |
| Delete email [DEPRECATED] | This action has been deprecated. Please use Delete email (V2) instead. |
| Delete an event (V2) | This operation deletes an event in a calendar. |
| Delete event [DEPRECATED] | This action has been deprecated. Please use the Delete event (V2) instead. |
| Export email (V2) | Export the content of the email. |
| Export email [DEPRECATED] | This action has been deprecated. Please use Export email (V2) instead. |
| Find meeting times (V2) | Find meeting time suggestions based on organizer, attendee availability, and time or location constraints |
| Find meeting times [DEPRECATED] | This action has been deprecated. Please use Find meeting times (V2) instead. |
| Flag email (V2) | This operation updates an email flag. |
| Flag email [DEPRECATED] | This action has been deprecated. Please use Flag email (V2) instead. |
| Forward an email | Forward an email. |
| Forward an email (V2) | Forward an email. |
| Get Attachment (V2) | This operation gets an email attachment by id. |
| Get attachment [DEPRECATED] | This action has been deprecated. Please use Get Attachment (V2) instead. |
| Get a calendar view of events (V2) [DEPRECATED] | This action has been deprecated. Please use Get calendar view of events (V3) instead. |
| Get calendar view of events (V3) | This operation gets all events (including instances of recurrences) in a calendar using Graph API. (V3) |
| Get a calendar view of events [DEPRECATED] | This action has been deprecated. Please use Get calendar view of events (V3) instead. |
| Get calendars (V2) | This operation lists available calendars. |
| Get calendars [DEPRECATED] | This action has been deprecated. Please use Get calendars (V2) instead. |
| Get contact (V2) | This operation gets a specific contact from a contacts folder. |
| Get contact [DEPRECATED] | This action has been deprecated. Please use Get contact (V2) instead. |
| Get contact folders (V2) | This operation lists available contacts folders using Graph API |
| Get contact folders [DEPRECATED] | This action has been deprecated. Please use Get contact folders (V2) instead. |
| Get contacts (V2) | This operation gets contacts from a contacts folder. |
| Get contacts [DEPRECATED] | This action has been deprecated. Please use Get contacts (V2) instead. |
| Get email (V2) | This operation gets an email by id. |
| Get email [DEPRECATED] | This action has been deprecated. Please use Get email (V2) instead. |
| Get emails (V2) [DEPRECATED] | This action has been deprecated. Please use Get emails (V3) instead. |
| Get emails (V3) | This operation gets emails from a folder via graph APIs. |
| Get emails [DEPRECATED] | This action has been deprecated. Please use Get emails (V3) instead. |
| Get event (V1) [DEPRECATED] | This action has been deprecated. Please use the Get event (V3) instead. |
| Get event (V2) [DEPRECATED] | This action has been deprecated. Please use the Get event (V3) instead. |
| Get event (V3) | This operation gets a specific event from a calendar using Graph API. (V3) |
| Get events (V1) [DEPRECATED] | This action has been deprecated. Please use Get events (V4) instead. |
| Get events (V2) [DEPRECATED] | This action has been deprecated. Please use Get events (V4) instead. |
| Get events (V3) [DEPRECATED] | This action has been deprecated. Please use Get events (V4) instead. |
| Get events (V4) | This operation gets events from a calendar using Graph API. (V4) |
| Get mail tips for a mailbox | Get mail tips for a mailbox such as automatic replies / OOF message or if the mailbox is full. |
| Get mail tips for a mailbox (V2) | Get mail tips for a mailbox such as automatic replies / OOF message or if the mailbox is full. |
| Get room lists | Get all the room lists defined in the user’s tenant |
| Get room lists (V2) | Get all the room lists defined in the user’s tenant |
| Get rooms | Get all the meeting rooms defined in the user’s tenant |
| Get rooms (V2) | Get all the meeting rooms defined in the user’s tenant |
| Get rooms in the room list | Get the meeting rooms in a specific room list |
| Get rooms in room list (V2) | Get the meeting rooms in a specific room list |
| Mark as read [DEPRECATED] | This action has been deprecated. Please use Mark as read or unread (V2) instead. |
| Mark as read or unread (V2) | This operation marks an email as read/unread. |
| Move email (V2) | This operation moves an email to the specified folder. |
| Move email [DEPRECATED] | This action has been deprecated. Please use Move email (V2) instead. |
| Reply to email (V2) [DEPRECATED] | This action has been deprecated. Please use Reply to email (V3) instead. |
| Reply to email (V3) | This operation replies to an email. |
| Reply to email [DEPRECATED] | This action has been deprecated. Please use Reply to email (V3) instead. |
| Respond to an event invite (V2) | Respond to an event invite. |
| Respond to an event invite [DEPRECATED] | This action has been deprecated. Please use Respond to an event invite (V2) instead. |
| Send an email (V2) | This operation sends an email message. |
| Send an email [DEPRECATED] | This action has been deprecated. Please use Send an email (V2) instead. |
| Send an email from a shared mailbox (V2) | This operation sends an email from a shared mailbox. Your account should have permission to access the mailbox for this operation to succeed. |
| Send an email from a shared mailbox [DEPRECATED] | This action has been deprecated. Please use Send an email from a shared mailbox (V2) instead. |
| Send approval email | This operation sends an approval email and waits for a response from the recipient. Please refer to the following link regarding the support of actionable messages in different mail clients. |
| Send an email with options | This operation sends an email with multiple options and waits for the recipient to respond with one of the options. Please refer to the following link regarding the support of actionable messages in different mail clients. |
| Set up automatic replies | Set the automatic replies setting for your mailbox. |
| Set up automatic replies (V2) | Set the automatic replies setting for your mailbox. |
| Update contact (V2) | This operation updates a contact in a contacts folder. |
| Update contact [DEPRECATED] | This action has been deprecated. Please use Update contact (V2) instead. |
| Update event (V1) [DEPRECATED] | This action has been deprecated. Please use the Update event (V4) instead. |
| Update event (V2) [DEPRECATED] | This action has been deprecated. Please use the Update event (V4) instead. |
| Update event (V3) [DEPRECATED] | This action has been deprecated. Please use Update event (V4) instead. |
| Update event (V4) | This operation updates an event in a calendar using Graph API. |
| Update my contact’s photo | Updates the photo of the specified contact of the current user. The size of the photo must be less than 4 MB. |
Available & Deprecated Triggers:
| When a new email arrives (V2) [DEPRECATED] | This action has been deprecated. Please use When a new email arrives (V3) instead. |
| When a new email arrives (V3) | This operation triggers a flow when a new email arrives. It will skip any email that has a total message size greater than the limit put by your Exchange Admin or 50 MB, whichever is less. It may also skip protected emails and emails with invalid body or attachments. |
| When a new email arrives (webhook) [DEPRECATED] | This operation triggers a flow when a new email arrives. |
| When a new email arrives [DEPRECATED] | This action has been deprecated. Please use When a new email arrives (V3) instead. |
| When a new email arrives in a shared mailbox (V2) | This operation triggers a flow when a new email arrives in a shared mailbox. Your account should have permission to access the mailbox for this operation to succeed. It will skip any email that has a total message size greater than the limit put by your Exchange Admin or 50 MB, whichever is less. It may also skip protected emails and emails with invalid body or attachments. |
| When a new email arrives in a shared mailbox [DEPRECATED] | This action has been deprecated. Please use When a new email arrives in a shared mailbox (V2) instead. |
| When a new email mentioning me arrives (V2) | This operation triggers a flow when a new email mentioning me arrives. It will skip any email that has a total message size greater than the limit put by your Exchange Admin or 50 MB, whichever is less. It may also skip protected emails and emails with invalid body or attachments. |
| When a new email mentioning me arrives [DEPRECATED] | This action has been deprecated. Please use When a new email mentioning me arrives (V2) instead. |
| When a new event is created (V1) [DEPRECATED] | This action has been deprecated. Please use When a new event is created (V3) instead. |
| When a new event is created (V2) [DEPRECATED] | This action has been deprecated. Please use When a new event is created (V3) instead. |
| When a new event is created (V3) | This operation triggers a flow when a new event is created in a calendar. (V3) |
| When an email is flagged (V2) | This operation triggers a flow when an email is flagged. |
| When an email is flagged [DEPRECATED] | This action has been deprecated. Please use When an email is flagged (V2) instead. |
| When an event is added, updated, or deleted (V2) | This operation triggers a flow when an event is added, updated, or deleted in a calendar. (V2) |
| When an event is added, updated, or deleted [DEPRECATED] | This action has been deprecated. Please use When an event is added, updated, or deleted (V2) instead. |
| When an event is modified (V1) [DEPRECATED] | This action has been deprecated. Please use When an event is modified (V3) instead. |
| When an event is modified (V2) [DEPRECATED] | This action has been deprecated. Please use When an event is modified (V3) instead. |
| When an event is modified (V3) | This operation triggers a flow when an event is modified in a calendar. (V3) |
| When an upcoming event is starting soon (V2) [DEPRECATED] | This action has been deprecated. Please use When an upcoming event is starting soon (V3) instead. |
| When an upcoming event is starting soon (V3) | This operation triggers a flow when an upcoming calendar event is starting. |
| When an upcoming event is starting soon [DEPRECATED] | This action has been deprecated. Please use When an upcoming event is starting soon (V3) instead. |
Example: We are creating a small app with Office 365 Outlook as connection, where we can perform the task, such as show email, send an email, delete email, and reply to an email.
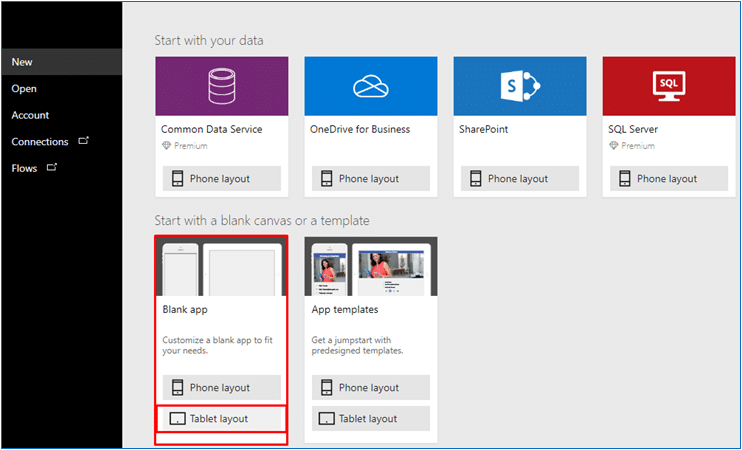
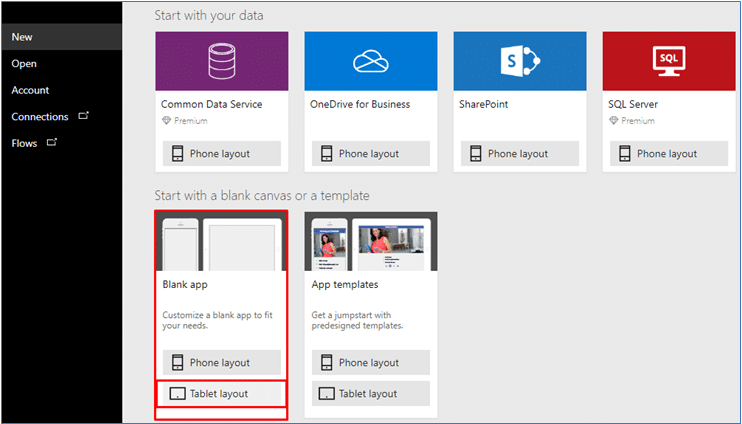
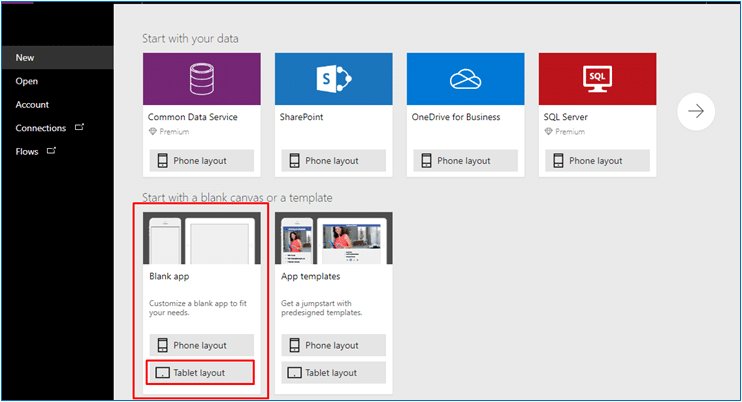
Step 1: Create a blank Canvas App.
Click on new -> App -> Canvas App -> Tablet Layout.
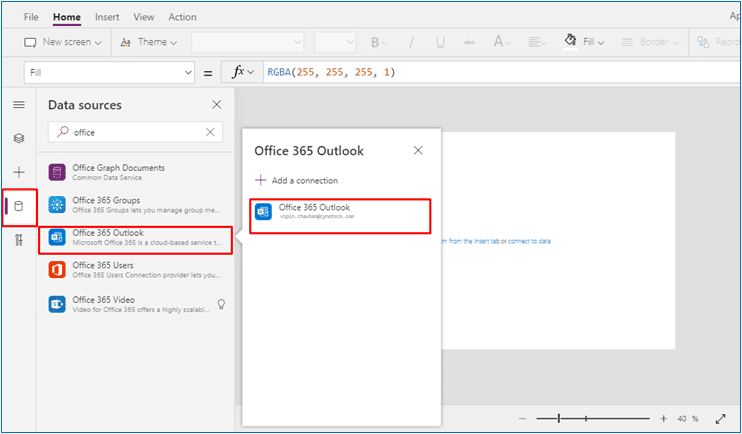
Step 2: Add Connection.
Click on View -> Click on Data Source -> Select Office 365 Outlook from the list -> Click on Office 365 Outlook.
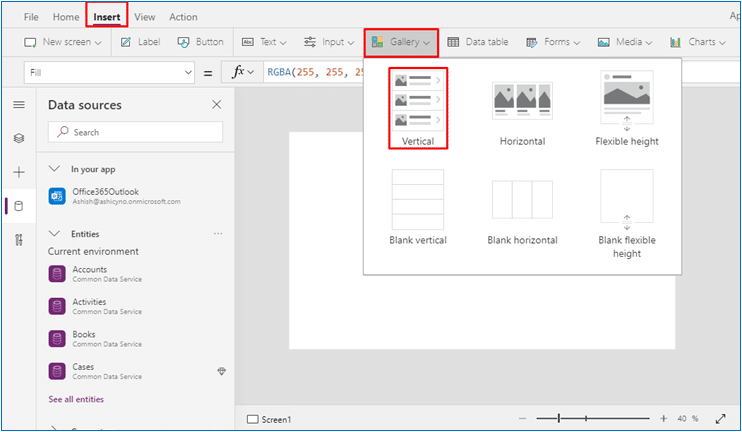
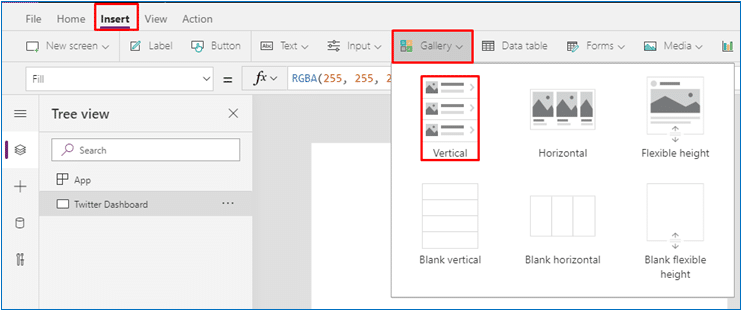
Step 3: Insert Controls. Click on Insert -> Click on Gallery -> Select Vertical.
Step 4: Design your gallery.
Remove unwanted controls from the gallery. Afterward, select the gallery and change the Name of Labels. Check the screenshot.
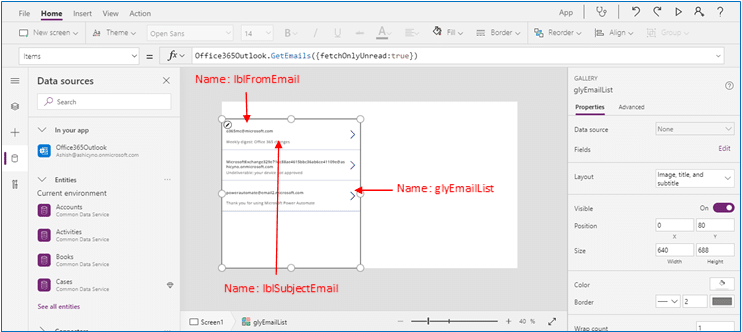
Need the following settings:
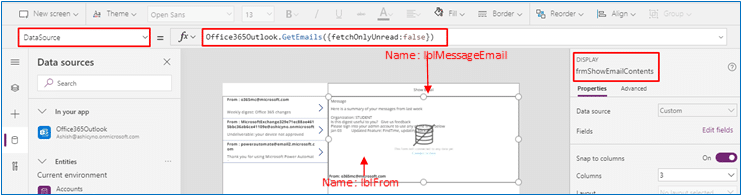
4.1 Select Gallery -> Set its Items property to the following formula: Office365Outlook.GetEmails({fetchOnlyUnread:true})

4.2 Select the first Label (Name: lblFromEmail) -> Set its Text property to the following formula:
“From : “& ThisItem.From

4.3 Select the Second Label (Name: lblSubjectEmail) -> Set its Text property to the following formula:
ThisItem.Subject

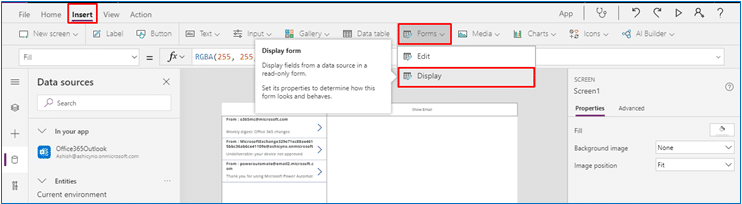
Step 5: Design for display email contents: on the right side we insert a form in which we display the email details.
Click on Insert -> Click on Forms -> Select Display.
Step 5.1: Select the form & change the Form Name to frmShowEmailContents.
Set its Data source property to the following formula:
Office365Outlook.GetEmails({fetchOnlyUnread:true})
Set its Items property to the following formula:
glyEmailList.Selected
Step 5.2: Select form -> Add fields -> for show body and part of email.
For display message body. Label Name: lblMessageEmail
Set its Text property to the following formula:
ThisItem.BodyPreview

For display from: Label Name: lblFrom
Set its Text property to the following formula:
“From: “&ThisItem.From

Note: You can add ThisItem.Bcc, ThisItem.Cc, ThisItem.Subject, ThisItem.To, ThisItem.DateTimeReceived, ThisItem.Attachments, etc. as per your requirement.
Step 6: Now we create a small functionality for the reply to an email or draft a new email.
Use Insert -> TextBox Control
Select the Send Button
-> Set its OnSelect property to the following formula:
Office365Outlook.SendEmail(txtDraftTo.Text,txtDraftSubject.Text,txtDraftMessage.Text)
Select the Reset Button
->Set its OnSelect Property to the following formula:
Reset(txtDraftSubject);
Reset(txtDraftMessage)
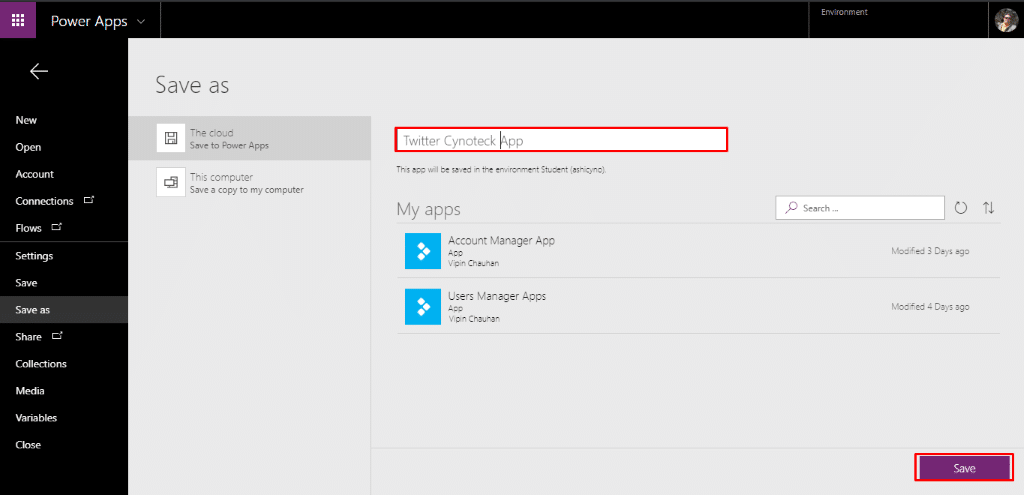
Step 7: Save: Click on File -> Input the app name -> click on Save.

Also, read: What to Consider When Choosing Between Power Apps and Custom Apps
Use Office 365 User Connector into Canvas App
Office 365 Users Connection provider lets you access user profiles in your organization using your Office 365 account. You can perform various actions such as get your profile, a user’s profile, a user’s manager, or direct reports and also update a user profile.
Available & Deprecated Actions:
| Get direct reports (V1) [DEPRECATED] | This action has been deprecated. Please use Get direct reports (V2) instead. |
| Get direct reports (V2) | Retrieves the user profiles of the specified user’s direct reports. |
| Get manager (V1) [DEPRECATED] | This action has been deprecated. Please use Get manager (V2) instead. |
| Get manager (V2) | Retrieves the profile of the specified user’s manager. |
| Get my profile (V1) [DEPRECATED] | This action has been deprecated. Please use Get my profile (V2) instead. |
| Get my profile (V2) | Retrieves the profile of the current user. |
| Get my trending documents | Retrieves the trending documents for the signed in user |
| Get relevant people | Get relevant people. |
| Get trending documents | Retrieves the trending documents for a user |
| Get user photo (V1) [DEPRECATED] | This action has been deprecated. Please use Get user photo (V2) instead. |
| Get user photo (V2) | Retrieves the photo of the specified user if they have one |
| Get user photo metadata | Get user photo metadata. |
| Get user profile (V1) [DEPRECATED] | This action has been deprecated. Please use Get user profile (V2) instead. |
| Get user profile (V2) | Retrieves the profile of a specific user. |
| Search for users | Retrieves the user profiles that match the search term. |
| Search for users (V2) | Retrieves the user profiles that match the search term (V2). |
| Update my profile | Updates the profile of the current user |
| Update my profile photo | Updates the profile photo of the current user. The size of the photo must be less than 4 MB. |
Available Functions
| Function Name | Description |
| Direct Reports | Returns the direct reports for the specified user. |
| Manager | Retrieves user profile for the manager of the specified user. |
| My Profile | Retrieves the profile for the current user. |
| Search User | Retrieves search results of user profiles. |
| User Profile | Retrieves a specific user profile. |
Example:
In This Example: We create a Canvas App which manages Office365 User.
Step 1: Create a blank Canvas App. Click on new -> Click on App -> Select Canvas App -> Click on Tablet Layout (Blank App).
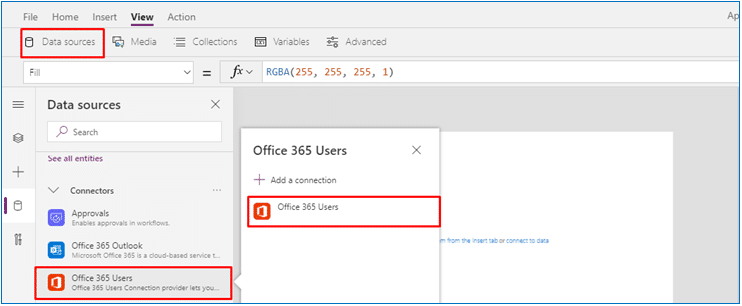
Step 2: Add Connection.
Click on View -> Click on Data Source -> Select Office 365 Users from the list -> Click on Office 365 Users.
Step 3: Insert Controls.
Step 3.1: Click on Insert -> Click on Label Control.

Properties Settings:
Name : lblTop
Text : User Dashboard
Position : X-0 & Y-0
Size : Width-1366 & Height-60
Border : 2
Step 3.2: Display Login User Image.
Click on Insert -> Click on Image.
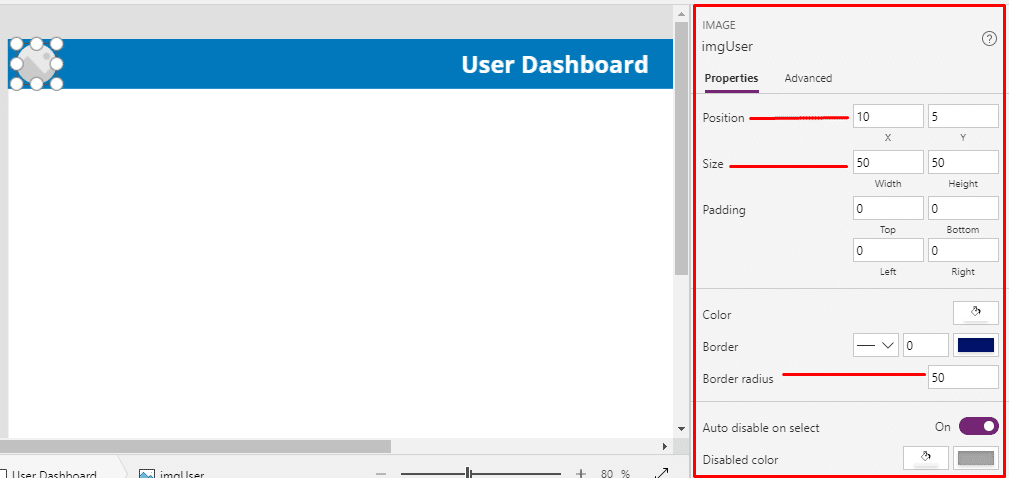
Properties Settings:
Name : imgUser
Position : X-10 & Y-5
Size : Width-50 & Height-50
Border Radius: 50
Set its Image property to the following formula :
User().Image

Step 3.3: Display Login User Name Full Name. Click on Insert -> Click on Label.
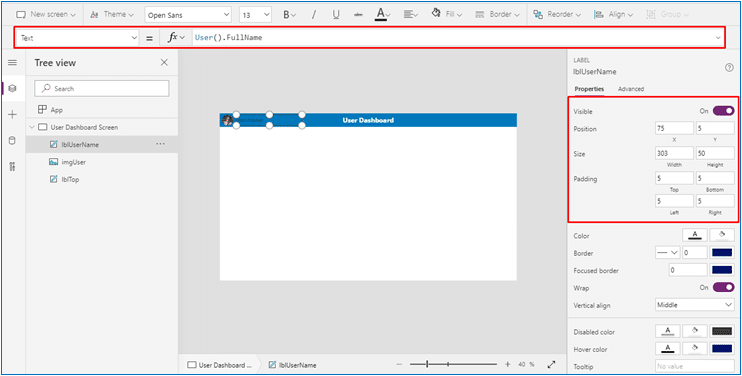
Properties Settings:
Name : lblUserName
Position : X-75 & Y-5
Size : Width-303 & Height-50
Set its Text property to the following formula :
User().FullName
Step 3.4: Creating a Search Box for Search User. Click on Insert -> Click on Text -> Select the Text Input Control
| Properties Settings: Name : txtSearchUser Position : X-10 & Y-115 Size : Width-460 & Height-50 Border : 2 Border Radius : 5 |  |
Step 3.5: Creating a Gallery for Display User. Click on Insert -> Click on Gallery -> Select Vertical Gallery.
| Gallery Properties Settings: Name : glyDisplayUser Position : X-10 & Y-165 Size : Width-460 & Height-590 Border : 2 Set its Items Property to the following formula: Office365Users.SearchUser({searchTerm:txtSearchUser.Text}) Image Control: Set its Image Property to the following formula: Office365Users.UserPhotoV2(ThisItem.Id) Title Label Control: Set Its Text Property to the following formula: ThisItem.DisplayName Subtitle Label Control: Set Its Text Property to the following formula: ThisItem.Department |  |
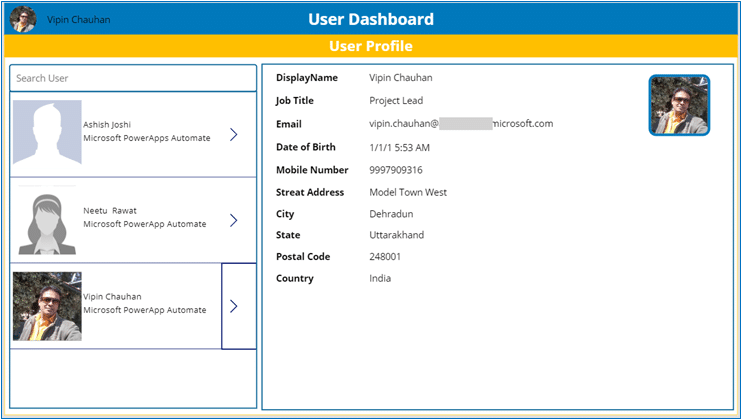
Step 3.6: Display Selected User Profile: Click on Insert -> Click on Forms -> Select Display.
| Forms Properties Settings: Name : frmDisplayUserProfile Position : X– 480 & Y-114 Size : Width-878 & Height-644 Border : 2 Columns : 1 Set Its DataSource Property to the following formula: Office365Users.UserProfileV2(glyDisplayUser.Selected.Id) Set Its Item Property to the following formula: Office365Users.UserProfileV2(glyDisplayUser.Selected.Id) Click on Edit Fields -> Add Custom Tab -> Click on Insert -> Labels (Insert Multiple Labels) Set Labels Text Property to the following formula: ThisItem.displayName ThisItem.jobTitle ThisItem.mail ThisItem.birthday ThisItem.mobilePhone ThisItem.streetAddress ThisItem.city ThisItem.state ThisItem.postalCode ThisItem.country |  |
After setting up all the labels. Press [F5]. Your app display on the screen. Select User Name from the left side and details of the selected user on the left side.
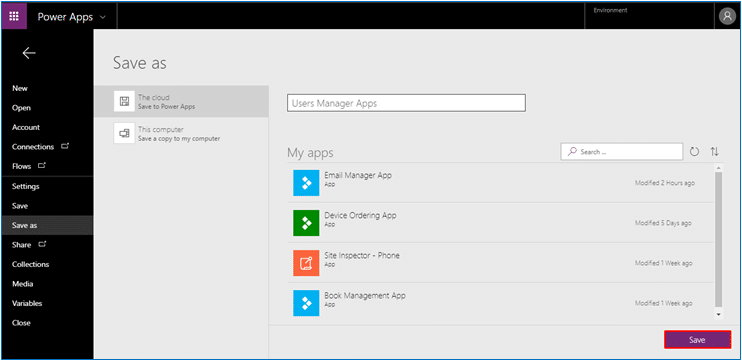
Step 4: Save the App. Click on File -> Type App Name -> Click on Save.
Use Dynamics 365 Connector into Canvas App
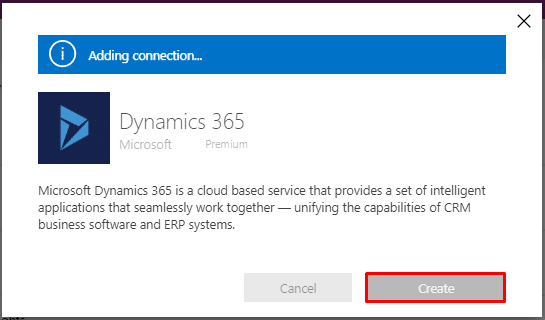
Microsoft Dynamics 365 is a cloud-based service that provides a set of intelligent applications that seamlessly work together — unifying the capabilities of CRM business software and ERP systems.
Available Actions:
| Create a new record | This operation creates a new record of an entity |
| Create a new record | This operation creates a new record of an entity (with option sets exposed as strings) |
| Delete a record | This operation deletes a record from an entity collection |
| Get record | This operation retrieves the specified record for an entity |
| Get record | This operation retrieves the specified record for an entity (with option sets exposed as strings) |
| List records | This operation gets records for an entity |
| List records | This operation gets records for an entity (with option sets exposed as strings) |
| Update a record | This operation updates an existing record for an entity |
| Update a record | This operation updates an existing record for an entity (with option sets exposed as strings) |
Available Triggers:
| When a record is created | Triggers a flow when an object is created in Dynamics 365 |
| When a record is created | Triggers a flow when an object is created in Dynamics 365 (with option sets exposed as strings) |
| When a record is created or updated | Triggers a flow when an object is created or modified in Dynamics 365 (with option sets exposed as strings) |
| When a record is deleted | Triggers a flow when an object is deleted in Dynamics 365 |
| When a record is updated | Triggers a flow when an object is modified in Dynamics 365 |
Example: We are creating sample app using Dynamics 365 Connector.
Step 1: Adding Dynamics 365 Connection, Click on Data -> Click on Connections -> Select Dynamics 365.
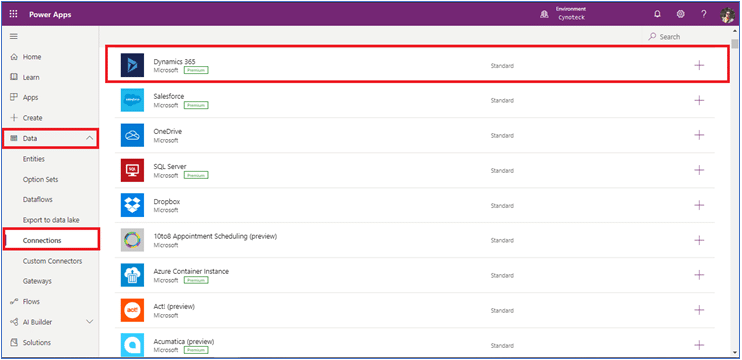
Step 2: Click on the Create button.
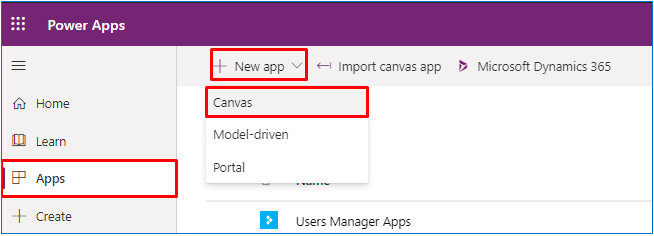
Step 3: Create a Canvas App: Click on App -> Click on New -> Click on Canvas
Click on Arrow -> Select Dynamics 365 from Connections -> Select Accounts Table -> Click on Connect.
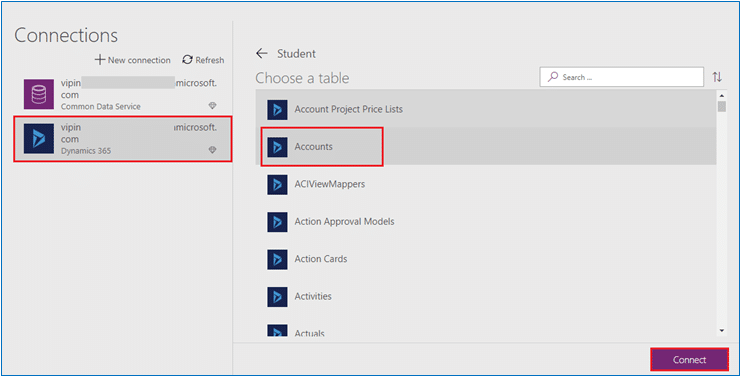
A Canvas App with basic features of Add, Edit, Search, and show list will be ready.
Step 4: Click on File -> click on Save -> Type name of App -> Click on Save button.
Also, read: Microsoft Power Apps: Canvas apps vs Model-driven apps
Use Power apps connector into Canvas App
Dynamics 365 Business Central is a business management solution for small and mid-sized organizations that automates and streamlines business processes and helps you manage your business.
Available Actions
| Create record | Creates a Dynamics 365 Business Central record |
| Delete record | Deletes a Dynamics 365 Business Central record |
| Execute action | Executes a Dynamics 365 Business Central action. |
| Get record | Retrieves a Dynamics 365 Business Central record |
| Get record types | Retrieves Dynamics 365 Business Central record types |
| Update record | Updates an existing Dynamics 365 Business Central record |
Available Triggers
| When a customer approval is requested | Triggers a flow when a customer approval request occurs in Dynamics 365 Business Central. |
| When a general journal batch approval is requested | Triggers a flow when a general journal batch approval request occurs in Dynamics 365 Business Central. |
| When a general journal line approval is requested | Triggers a flow when a general journal line approval request occurs in Dynamics 365 Business Central. |
| When a purchase document approval is requested | Triggers a flow when a purchase document approval request occurs in Dynamics 365 Business Central. |
| When a record is changed | Triggers a flow when a record is changed in Dynamics 365 Business Central |
| When a record is created | Triggers a flow when a record is created in Dynamics 365 Business Central |
| When a record is deleted | Triggers a flow when a record is deleted in Dynamics 365 Business Central |
| When a record is modified | Triggers a flow when a record is modified in Dynamics 365 Business Central |
| When a sales document approval is requested | Triggers a flow when a sales document approval request occurs in Dynamics 365 Business Central. |
| When a vendor approval is requested | Triggers a flow when a vendor approval request occurs in Dynamics 365 Business Central. |
| When an item approval is requested | Triggers a flow when an item approval request occurs in Dynamics 365 Business Central. |
Example: We are creating a sample app using Dynamics 365 Business Central.
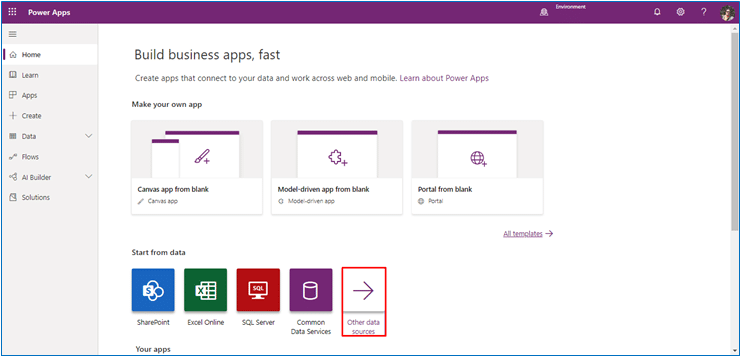
Step 1: Adding Dynamics 365 Business Central Connection, Click on Home -> Click on Other Data Sources.
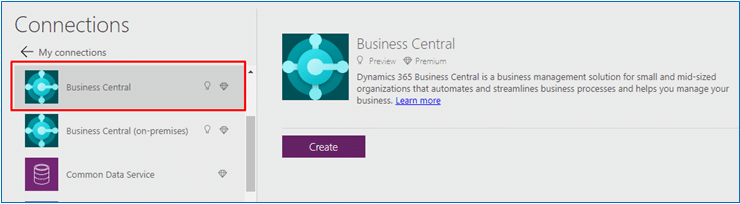
Step 2: Click on New Connection -> Select Business Central -> Click on the Create Button.
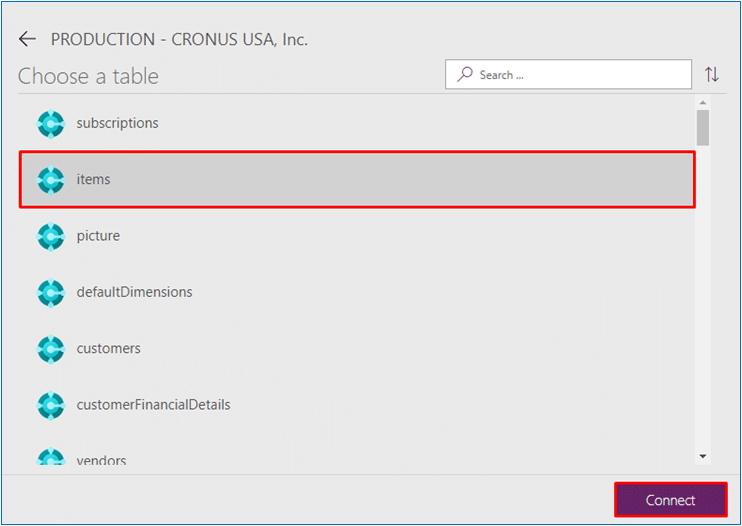
Step 3: Choose a dataset Production.

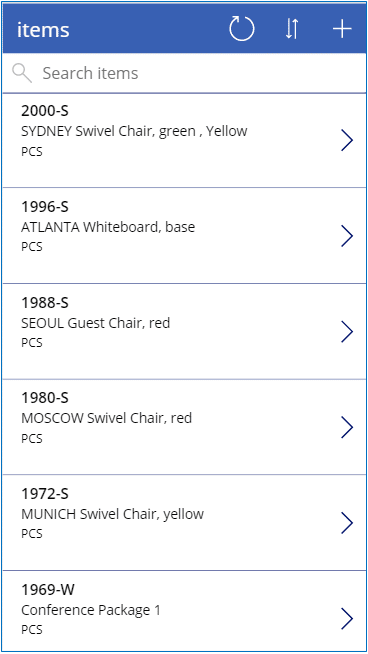
Step 4: Select a table Name: Item -> Click on Connect.
Step 5: A Canvas app with basic features such as Add, Update, Delete & Search will be ready to use.
Note: You can modify the screen/ fields as per your choice.
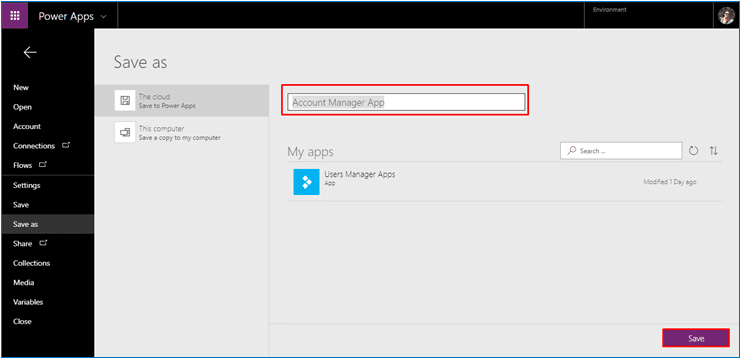
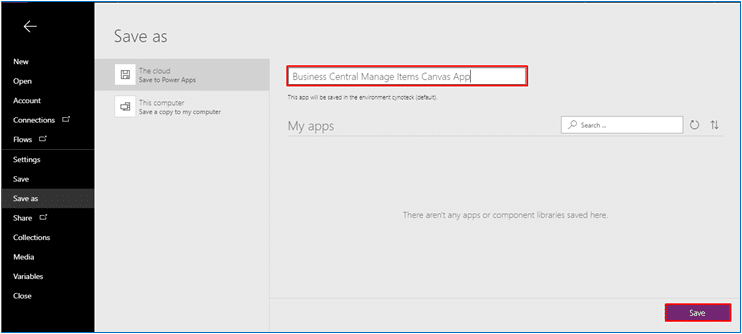
Step 6: Click on File -> click on Save -> Input the app name -> Click on Save
Use Twitter connector into Canvas App
Twitter is an online social networking service that enables users to send and receive short messages called ‘tweets’. Connect to Twitter to manage your tweets. You can perform various actions such as sending a tweet, search, view followers, etc.
Twitter connector Limitation:
The following are some of the limits and restrictions:
- Maximum number of connections per user: 2
- API call rate limit for POST operation: 12 per hour
- API call rate limit for other operations: 600 per hour
- Frequency of trigger polls: 1 hour
- Maximum size of image upload: 5 MB
- Maximum size of video upload: 15 MB
- Maximum number of search results: 100
- Maximum number of new tweets tracked within one polling interval: 5
- Search API searches against a sampling of recent Tweets published in the past 7 days
- Standard search API is focused on relevance and not completeness. This means that some Tweets and users may be missing from search results.
Available Actions:
| Get followers | This operation gets the list of users that follow a given user. |
| Get following | The operation gets the list of people the given user follows. |
| Get home timeline | This operation gets the most recent tweets and re-tweets posted by me and my followers. |
| Get my followers | This operation gets the list of users who are following me. |
| Get my following | This operation gets the list of users that I am following. |
| Get user | This operation gets the profile details for a given user, such as user name, description, followers count, and more. |
| Get user timeline | This operation gets a list of the most recent tweets posted by a given user. |
| Post a tweet | This operation posts a new tweet. |
| Retweet | This operation retweets a tweet. |
| Search tweets | This operation gets a list of relevant tweets matching the search query. |
Available Triggers:
| When a new tweet is posted | This operation triggers a flow when a new tweet that matches a given search query is posted. |
Example:
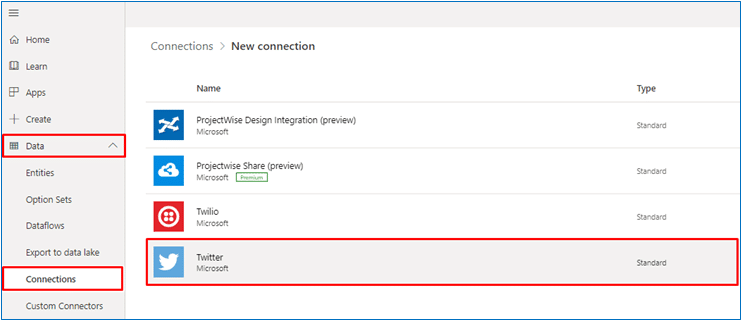
Step 1: Adding Twitter Connection, Click on Data -> Click on Connection -> Select Twitter.
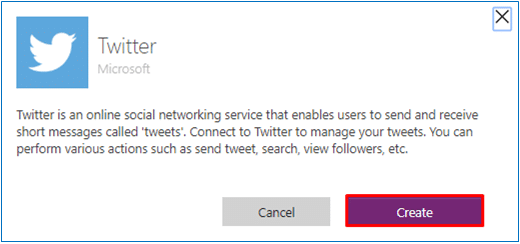
Step 2: Click on Create Button -> Follow up with Authorization screen with Twitter credentials.
Step 3: Create a Canvas App: Click on App -> Select Canvas App

Click on Blank Canvas Tablet Layout App.
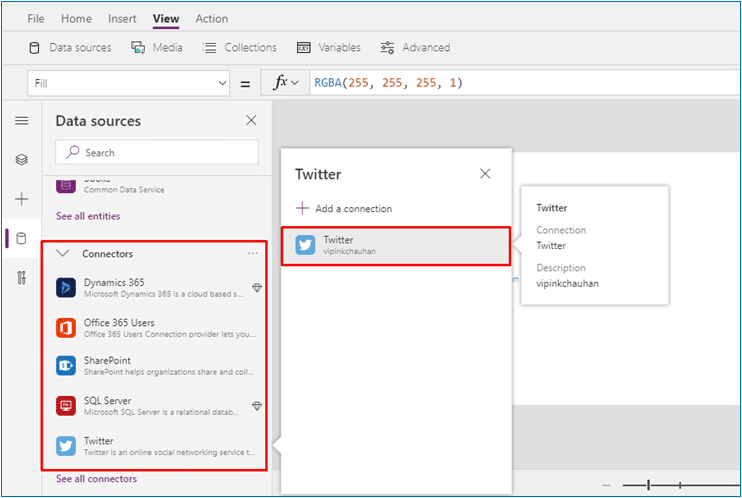
Step 4: Click on View -> Click on Data Source -> Click on Connectors -> Click on Twitter -> Select Twitter.
Step 5: Show Twitter Home Screen, Click on Insert -> Click on Gallery -> Click on Vertical.
Step 5.1: Select the Gallery to do the following settings
| -> Set its Items property to the following formula: Twitter.HomeTimeline() -> Select the Title & set its Text Property to the following formula: ThisItem.TweetText -> Select the Subtitle & set its Text Property to the following formula: ThisItem.TweetedBy -> Select the Image & set its Image Property to the following formula: ThisItem.UserDetails.ProfileImageUrl |  |
Step 6: Show Tweet Details: Click on Insert -> Click on Forms -> Click on Display.
Select the form -> Set its Item Property to the following formula:
glyTwitterHomeTimeLine.Selected
Insert some labels and change text property:
| -> Click on Insert -> Click on Label Set its Text Property to the following formula: ThisItem.TweetText -> Click on Insert -> Click on Label Set its Text Property to the following formula: ThisItem.UserDetails.FullName -> Click on Insert -> Click on Label Set its Text Property to the following formula: ThisItem.TweetedBy -> Click on Insert -> Click on Label Set its Text Property to the following formula: ThisItem.CreatedAtIso |  |
Step 7: Click on File ->Click on Save -> Input App Name -> Click on Save Button.
Use MS Project online Connector into Canvas App
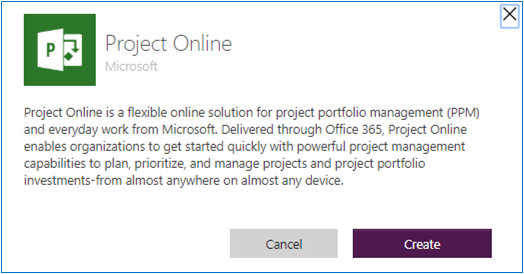
Project Online is a flexible online solution for project portfolio management (PPM) and everyday work from Microsoft. Delivered through Office 365, Project Online enables organizations to get started quickly with powerful project management capabilities to plan, prioritize, and manage projects and project portfolio investments-from almost anywhere on almost any device.
Available Actions:
| Check in and publish project | Check in and publish an existing project in your site. |
| Checkout project | Checks out an existing project on your site. |
| Create new resource | Creates an Enterprise Resource in your Project Online site. |
| Creates a new project | Creates a new project in your project online site. |
| Creates a new task | Creates a new task in you project. |
| Get a project summary task | Gets the project summary task for a given project. |
| List project | Lists a project by Id in your project online site. |
| List projects | Lists the projects in your project online site. |
| Lists tasks | Lists the published tasks in a project. |
Available Triggers:
| When a new project is created | Triggers a flow whenever a new project is created. |
| When a new resource is created | Triggers a new flow when a new resource is created. |
| When a new task is created | Triggers a flow when a new task is created. |
| When a project is published | Triggers a flow whenever a project is published. |
Step 1: Adding Project Online Connection, Click on Data -> Click on Connection -> Select Project Online.
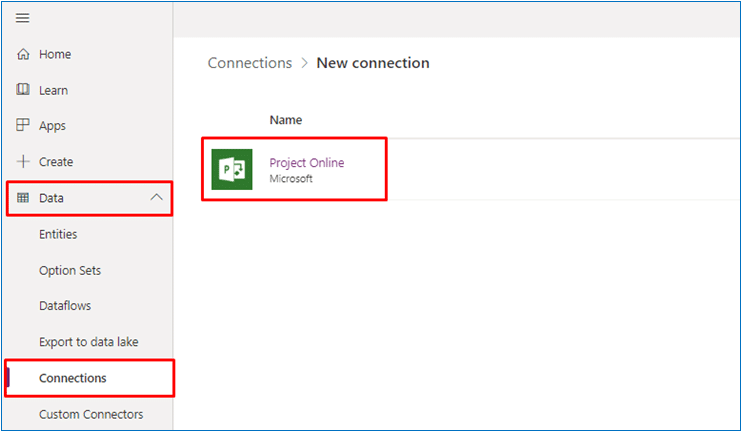
Step 2: Click on Create. -> Follow up with Authorization screen with twitter credentials.
Step 3: Create a Canvas App: Click on App -> Click on New App -> Select Canvas App
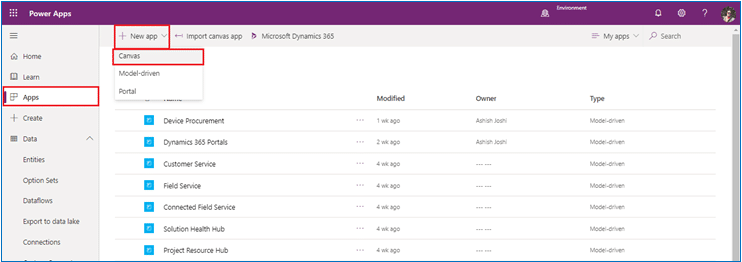
Click on Blank Canvas Tablet Layout App.

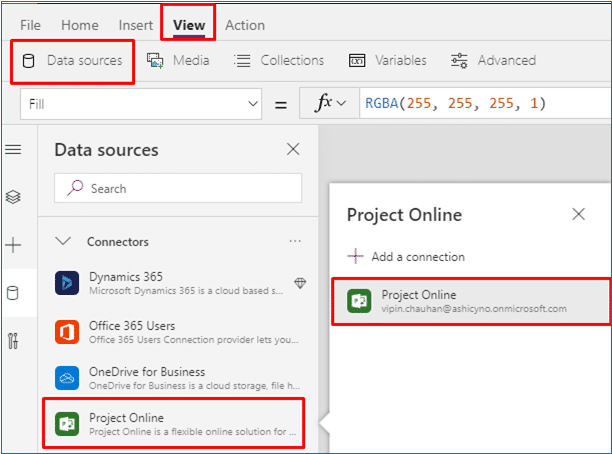
Step 4: Add Connection -> Click on View -> Click on Data Source -> In Connector List, Select Project Online -> Click on Project Online.
Step 5: Show All Project List: Click on Insert -> Click on Gallery -> Select Vertical Gallery ->
Select the Gallery -> Set its Item Property to the following formula:
ProjectOnline.ListProjects(“https://ashicyno.sharepoint.com/sites/pwa”).value
Insert some labels and change text property:
| Select the Title & set its Text Property to the following formula: ThisItem.ProjectIdentifier Select the Subtitle & set its Text Property to the following formula: ThisItem.Name |  |
Step 6: Show Project Wise Task List: Click on Insert -> Click on Gallery -> Select Vertical Gallery ->
Select the Gallery Set its Item Property to the following formula:
ProjectOnline.ListTasks(glyProjectsList.Selected.Id,”https://ashicyno.sharepoint.com/sites/pwa”).value
Insert some labels and change text property:
| Select the Title & set its Text Property to the following formula: ThisItem.Name Select the Subtitle & set its Text Property to the following formula: ThisItem.Start |  |
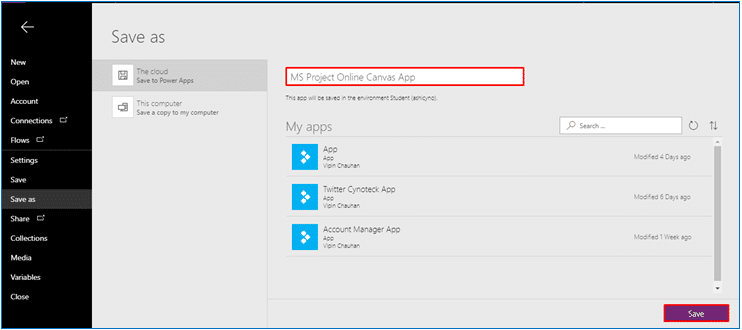
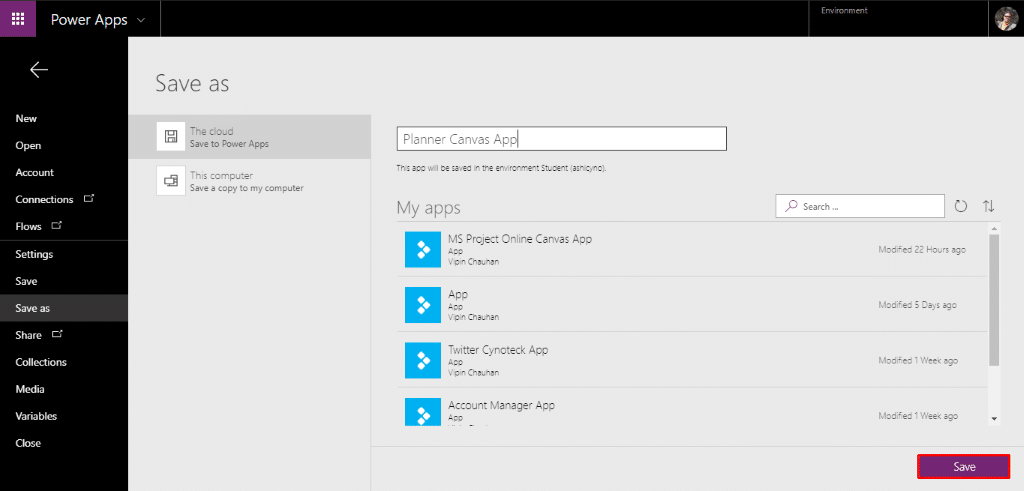
Step 7: Save the App: Click on Save -> Type the app name -> Click on Save.
Use Planner Connector into Canvas App
Microsoft Planner lets you easily bring together teams, tasks, documents, and conversations for better results.
Available & Deprecated Actions:
| Add assignees to a task | Add assignees an existing Planner task. |
| Create a bucket | Create a bucket in Planner for the specified plan and group. |
| Create a bucket [DEPRECATED] | This action has been deprecated. Please use Create a bucket instead. |
| Create a task | Create a new task in Planner. |
| Create a task [DEPRECATED] | This action has been deprecated. Please use Create a task instead. |
| Create a task [DEPRECATED] | This action has been deprecated. Please use Create a task instead. |
| Get a task | Get an existing Planner task. |
| Get a task [DEPRECATED] | This action has been deprecated. Please use Get a task instead. Get an existing Planner task. |
| Get task details | Get the task details for an existing task. |
| Get task details [DEPRECATED] | This action has been deprecated. Please use Get task details instead. |
| List buckets | List the buckets in a plan. |
| List buckets [DEPRECATED] | This action has been deprecated. Please use List buckets instead. |
| List buckets [DEPRECATED] | This action has been deprecated. Please use List buckets instead. |
| List my plans [DEPRECATED] | List the plans the user has subscribed to. |
| List my plans [DEPRECATED] | List the plans the user has subscribed to. |
| List my tasks | List the tasks assigned to me. |
| List my tasks [DEPRECATED] | This action has been deprecated. Please use List my tasks instead. |
| List plans for a group | List plans owned by the group specified. |
| List tasks | List the tasks in a plan. |
| List tasks [DEPRECATED] | This action has been deprecated. Please use List tasks instead. |
| List tasks [DEPRECATED] | This action has been deprecated. Please use List tasks instead. |
| Unassign users from a task | Unassign users from an existing Planner task. |
| Update a task | Update an existing Planner task. |
| Update a task (V2) | Update an existing Planner task. |
| Update a task [DEPRECATED] | This action has been deprecated. Please use Update a task (V2) instead. |
| Update task details | Update the task details for an existing task. |
| Update task details [DEPRECATED] | This action has been deprecated. Please use Update task details instead. |
Available & Deprecated Triggers:
| When a new task is created | This operation triggers when a new task is created. |
| When a new task is created [DEPRECATED] | This action has been deprecated. Please use When a new task is created instead. |
| When a new task is created [DEPRECATED] | This action has been deprecated. Please use When a new task is created instead. |
| When a task is assigned to me | This operation triggers when a task is assigned to me. |
| When a task is assigned to me [DEPRECATED] | This action has been deprecated. Please use When a task is assigned to me instead. |
| When a task is completed | This operation triggers when a task is completed. |
| When a task is completed [DEPRECATED] | This action has been deprecated. Please use When a task is completed instead. |
| When a task is completed [DEPRECATED] | This action has been deprecated. Please use When a task is completed instead. |
Example:
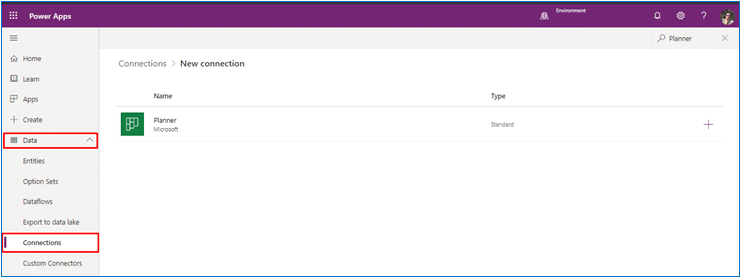
Step 1: Adding Planner Connection, Click on Data -> Click on Connection -> Select Planner.
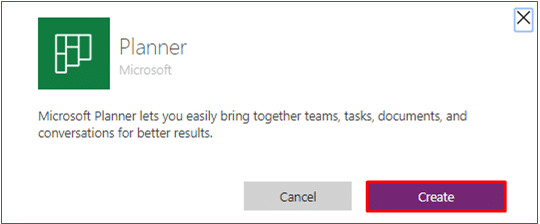
Step 2: Click on Create. -> Follow up with Authorization screen with your credentials.
Step 3: Create a Canvas App: Click on App -> Click on New app -> Select Canvas App

Click on Blank app Tablet Layout.

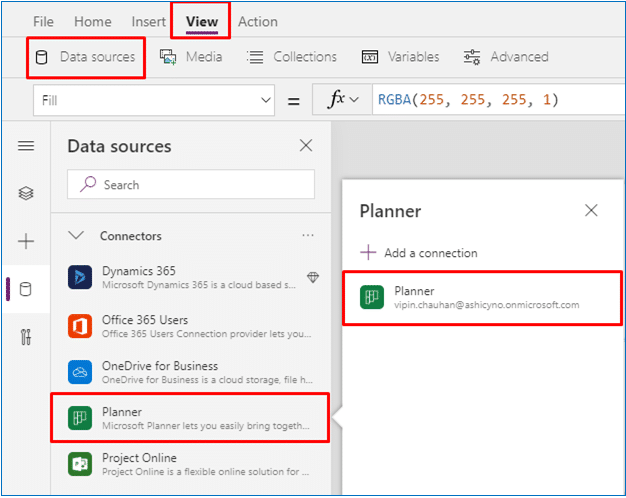
Step 4: Add Connection: Click on View -> Click on Data Source -> In Connector List, Select Planner -> Click on Planner.
Step 5: Show All Plans List: Click on Insert -> Click on Gallery -> Select Vertical Gallery ->
Select the Gallery -> Set its Item Property to the following formula:
Planner.ListMyPlans().value
Insert some labels and change text property:
| Select the Title & set its Text Property to the following formula: ThisItem.title |  |
Step 6: Show All Task List: Click on Insert -> Click on Gallery -> Select Vertical Gallery ->
Select the Gallery -> Set its Item Property to the following formula:
Planner.ListMyPlans().value
Insert some labels and change text property:
| Select the TaskName label & set its Text Property to the following formula: ThisItem.title Select the StartDate label & set its Text Property to the following formula: Text(ThisItem.startDateTime,”[$-en-US]dd-mm-yyyy”) Select the CreateDate label & set its Text Property to the following formula: ThisItem.createdDateTime |  |
Step 7: Save the App: Click on Save -> Type the app name -> Click on Save.
Use Salesforce Connector into Canvas App
The Salesforce Connector provides an API to work with Salesforce objects.
Available & Deprecated Actions:
| Close or abort a job | Closes or aborts a job. Use UploadComplete to close a job or Aborted to abort a job. If you close a job, Salesforce queues the job and uploaded data for processing, and you can’t add any additional job data. If you abort a job, the job does not get queued or processed. |
| Create a job (V2) | Creates a job, which represents a bulk operation (and associated data) that is sent to Salesforce for asynchronous processing. Provide job data via an Upload Job Data request. |
| Create a job [DEPRECATED] | This action has been deprecated. Please use Create a job (V2) instead. |
| Create record | This operation creates a record and allows null values. |
| Create record [DEPRECATED] | This operation creates a record. |
| Delete a job | Deletes a job. To be deleted, a job must have a state of UploadComplete, JobComplete, Aborted, or Failed. |
| Delete record | This operation deletes a record. |
| Get a Record by External ID | This operation retrieves a record using an external ID. |
| Get all jobs | Get a list of all jobs |
| Get job info | Retrieves detailed information about a job. |
| Get job results | Retrieves a list of records based on the result type for a completed job. |
| Get object types | This operation lists the available Salesforce object types. |
| Get record | This operation gets a record. |
| Get record [DEPRECATED] | This action has been deprecated. Please use Get record instead. |
| Get records | This operation gets records of a certain Salesforce object type like ‘Leads’. |
| Insert or Update (Upsert) a Record by External ID | This operation inserts or updates (upserts) a record using an external ID. |
| Update record | This operation updates a record and allows null values. |
| Update record [DEPRECATED] | This operation updates a record. |
| Upload job data | Uploads data for a job using CSV data. |
Available Triggers:
| When a record is created | This operation triggers when there are newly created records. |
| When a record is modified | This operation triggers when there are newly modified records. |
Available Top-Level Actions:
| Delegable | |
| Average | No |
| Filter | Yes |
| LookUp | Yes |
| Max | No |
| Min | No |
| Search | Yes |
| Sort | Yes |
| SortByColumns | Yes |
| Sum | No |
Filter and LookUp predicates:
| Salesforce | |
| Not | Yes |
| IsBlank | No |
| TrimEnds | No |
| Len | No |
| +, – | No |
| <, <=, =, <>, >, >= | Yes |
| And (&&), Or (||), Not (!) | Yes |
| in | Yes |
| StartsWith | No |
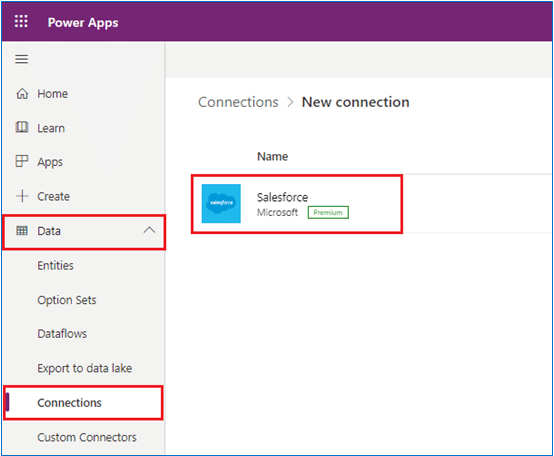
Step 1: Adding Salesforce Connection, Click on Data -> Click on Connection -> Select Salesforce.
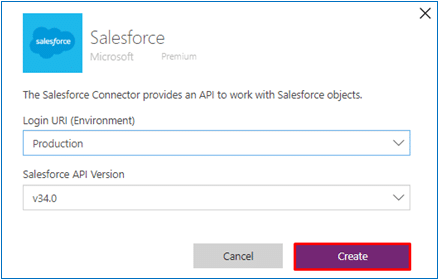
Step 2: Select the Production/Sandbox from the LoginURI dropdown -> Click on Create
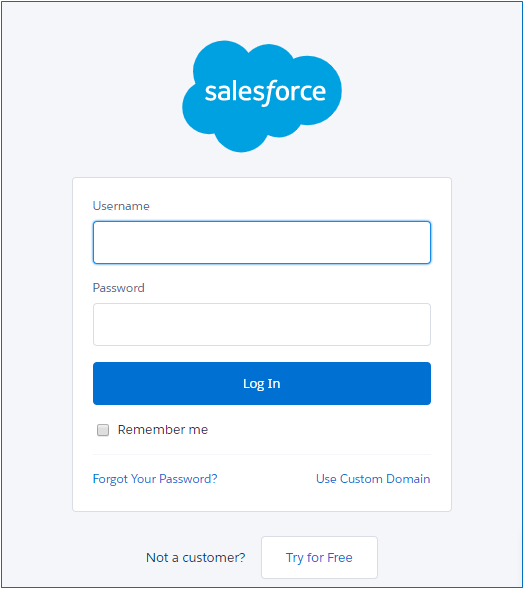
Step 3: Fill up the Salesforce Login Screen with your credentials. -> Click on the Login button
Step 4: In the Allow Access Screen -> Click on the Allow button.

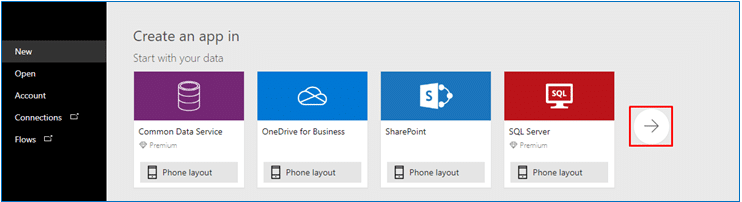
Step 5: Create a Canvas App: Click on App -> Click on Canvas App

Step 6: Click on Arrow.
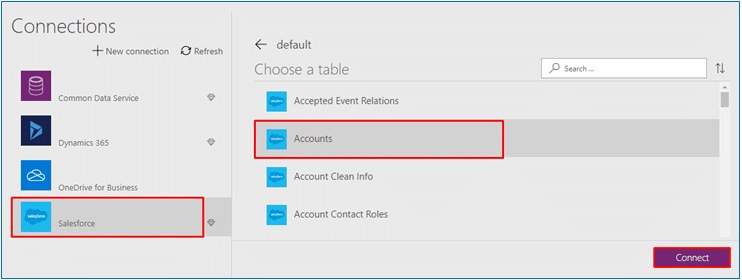
Step 7: Select Salesforce -> Select Accounts -> Click on Connect.
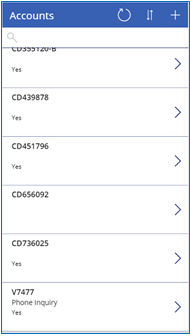
Step 8: A basic App with Feature Add, Delete, Update & search is available for use.
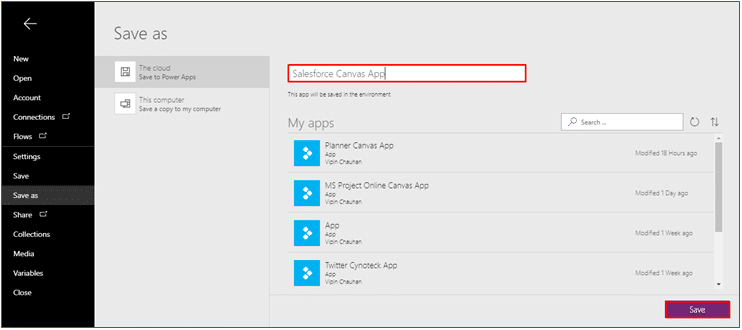
Step 9: Click on the File Menu -> Click on Save -> Type the app name -> Click on Save button.
Conclusion
To sum it up, diving into the world of Microsoft PowerApps connectors has been a journey into seamless integration and enhanced functionality. These connectors serve as the invisible threads stitching together diverse data sources, giving life to your applications.
As a Microsoft Power App developer, you’ve discovered the power of connectivity—how these bridges effortlessly link your apps to a myriad of services, unleashing a new realm of possibilities. The simplicity of implementation, coupled with the vast array of available connectors, makes PowerApps a formidable tool for crafting dynamic, interconnected solutions.
In your toolkit as a developer, these connectors are not just utilities; they’re the conduits through which your creativity flows, shaping apps that transcend boundaries. So, as you continue to harness the potential of Microsoft PowerApps connectors, remember, it’s not just about integration; it’s about elevating the entire app development experience. Happy connecting!
Microsoft Power Platform Consulting
Still, have a question? You are free to contact me or other experts in our team to showcase the real power of PowerApps to you.


Knowledgeable and easily understandable and very well explained with examples.
Awesome Article
Great Blog.