The Guide to Salesforce Deployment checklist
All good admins know that unless there is an exceptionally good reason to do otherwise, changes should be made in a sandbox environment. Especially if the changes are many and big, such as a lightning migration.
So, this means that once you are satisfied with the solution you have built, and testing has passed through (including UAT, if necessary), these changes will need to be deployed to production.
This final step is the cumulation of all your dedication and hard work, and there is the potential for many things and stuff to go wrong in the process. So, what should you do to ensure that everything goes swiftly?
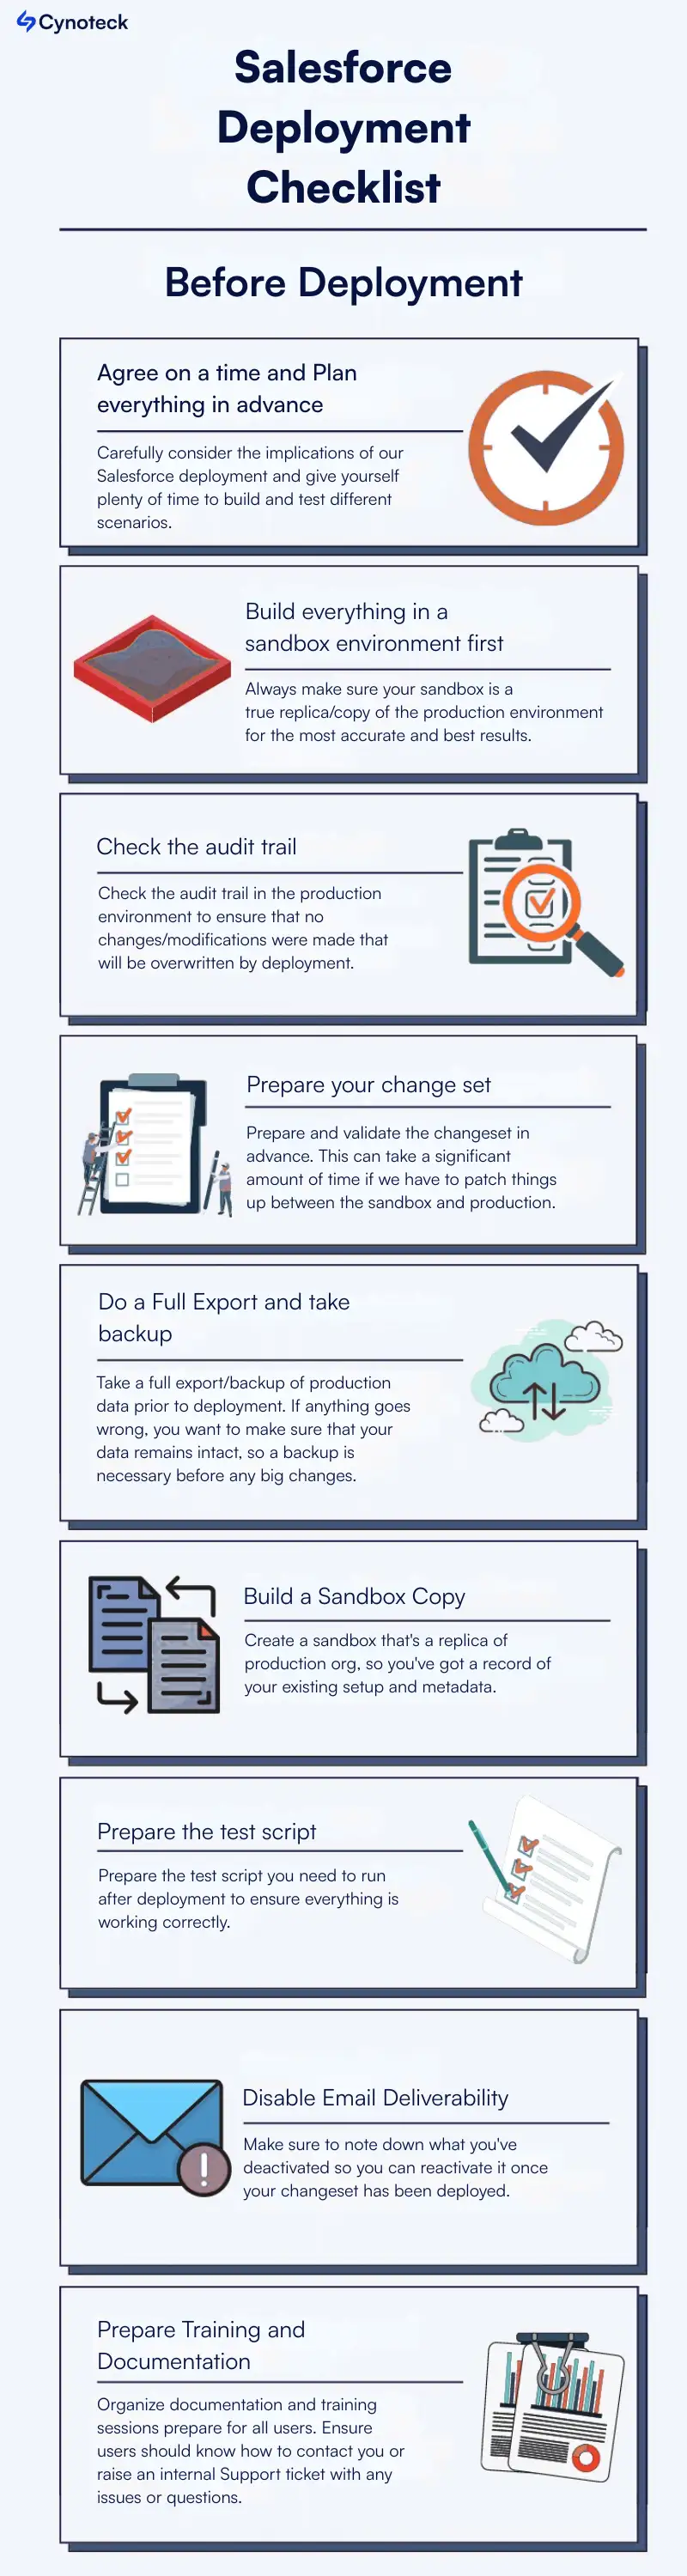
The best deployments are well planned and predetermined so that everything is accounted for well in advance of go-live. Carefully consider the implications of our Salesforce deployment and give yourself plenty of time to build and test different scenarios (Positive & negative) before initiating the deployment.
Deploying can be time-intensive, and with this, a lot of strange things happen. We definitely don’t want anyone to work in production while these changes are taking place. There are the following three main reasons:
a) We have to give ourselves more time to smoke, test your changes in production so that we can ensure everything is deployed and working fine.
b) We want to ensure that no changes are made in production as you roll out ours, as deploying a change set will overwrite any changes to production.
c) We don’t want the end-users to use the system before it is fully deployed, or before we have had a chance to brief them fully.
Also, read: Salesforce Vs SAP: Which CRM Software is Better
Instead, set time in advance and let everyone in the organization know that out of the user’s nonworking hours are usually best, if possible, to avoid user impact and give us time to fix any issues, which means evening/weekend for most businesses.
Ensure all users are notified and asked not to log into the org during this time frame. If we are working in a big org, or our deployment is a particularly large one, we might want to consider actually freezing users until deployment, post-deployment steps, and until the testing is complete.
A sandbox gives you a safe place to test applications and build-out prior to deployment. Always make sure your sandbox is a true replica/copy of the production environment for the most accurate and best results.
Also, read: HubSpot vs. Salesforce: Which CRM is Right for Your Business
Check the audit trail in the production environment to ensure that no changes/modifications were made that will be overwritten by deployment.
If they have, we may want to delay or postpone our deployment in order to get these changes migrated over to the sandbox or speak to the stakeholders involved. (It would be great to clarify with users that no changes are to be made in production before you start developing in the sandbox.)
Prepare and validate the changeset in advance. This can take a significant amount of time if we have to patch things up between the sandbox and production, and we don’t want to miss your deployment window because you hadn’t prepared.
There are a few things that may catch during validation, like renaming standard fields or any changes to API names, so watch out for these too.
Take a full export/backup of production data prior to deployment. If anything goes wrong, you want to make sure that your data remains intact, so a backup is necessary before any big changes.
Create a sandbox that’s a replica of production org, so you’ve got a record of your existing setup and metadata. Again, if anything goes wrong, you want to be able to revert to the current state of play required.
Also, read: Salesforce Outlook Integration: A Step-by-Step Guide
Prepare the test script you need to run after deployment to ensure everything is working correctly. Of course, as a good admin, you’ll have already done your testing in your sandbox before creating the changeset, but you should repeat it again in production to check everything has deployed as it should.
Have these test scripts (step-by-step instructions on what to test and how) prepared in advance, so you and your users can run through these tests quickly to check everything is functioning as expected.
Mass changes can trigger lots of system emails and notifications, so disable email deliverability while you deploy to ensure your users aren’t bombarded with an avalanche of mail. Make sure to note down what you’ve deactivated so you can reactivate it once your changeset has been deployed.
Deactivate Rules/ workflow rules /validation rules/flows /process builders– anything that might impact changes or prevent them from deploying correctly. Make sure that you run tests after we’ve reactivated these to ensure we have a fully functioning environment.
Also, read: The Guide to Salesforce Einstein Forecasting
If you are making big changes, your users may be confused afterward. Organize documentation and training sessions, prepare for all users. Ensure users know how to contact you or raise an internal Support ticket with any issues or questions.
If you are making really big changes, consider setting up a physical help desk in the office that users can approach for help – we’ve done this before for a client, and it really helped us to simplify the process.
.webp)
Do you need any manual changes or data updates? Now is the time. (Depending on the desired result, you will probably want to make sure workflow rules, process builders, and validation rules remain deactivated for this.)
Reactivate Anything Paused: if you paused your workflows and validation rules during deployment, now is the time to reactivate them.
Activate Workflows when deployed, rules, and automation are not automatically activated. Activate your new validation rules/ Process Builders/ workflows– anything that might not be active on deployment.
Test your changes – is everything working? Are you able to complete all processes as desired? Are our workflows and validation rules functioning correctly? Use the ‘login as user’ feature to log in as different users and check their profile access and preferences – are you seeing what you had expected to? If possible, ask your users to help you test too.
Also, read: An overview of what is Account Teams in Salesforce
Now that testing is complete and we are satisfied that everything is working, you can enable email deliverability so your users can receive emails again.
If everything is working successfully, congratulations! We have completed a successful deployment. The final step now is to allow our users to log in again if you disabled it, and to let them know the changes have taken place.
Make sure they have access to all the training, support and resources they need and check in periodically to ensure they’re as thrilled with your awesome changes as you’d expect them to be.
Here are some steps you can follow to prepare for a Salesforce deployment:
Identify your deployment goals: Clearly define the changes you want to make and the reasons for making them. This will help you to focus your efforts and ensure that your deployment is successful.
Review your source and target environments: Make sure you understand the differences between your source and target environments (e.g., sandbox, developer edition, production). This will help you identify any potential issues that may arise during the deployment process.
Create a deployment plan: Develop a plan that outlines the specific steps you will take to prepare for and execute the deployment. This should include details such as the components you will be deploying, the order in which they will be deployed, and any dependencies that need to be considered.
Back up your data: Before making any changes to your Salesforce instance, it’s a good idea to create a backup of your data. This will allow you to restore your system to a previous state if anything goes wrong during the deployment process.
Test your changes: Before deploying your changes to production, it’s important to thoroughly test them in a sandbox or developer edition environment. This will help you to identify and fix any issues before they affect your users.
Coordinate with your team: Make sure that everyone on your team is aware of the deployment plan and their role in the process. This will help to ensure that the deployment goes smoothly and that everyone is prepared for any changes that may be coming.
Communicate with your users: Let your users know about any changes that will be made to the system and how they may be affected. This will help to minimize disruption and ensure that your users are prepared for any changes.
By following these steps, you can effectively prepare for a Salesforce deployment and ensure that it goes smoothly.
Whether it's a Lightning migration, automation rollout, or major configuration update—we help you execute deployments with zero downtime.
Schedule a Deployment Strategy CallThere are several different types of Salesforce deployment, including:
A. Full deployment: This type of deployment involves moving all components of a Salesforce instance, including custom objects, fields, workflows, and data, from one environment to another.
B. Partial deployment: This type of deployment involves moving only a select number of components, such as a specific custom object or a specific set of data, from one environment to another.
C. In-place deployment: This type of deployment involves making changes directly to a production environment without first testing them in a sandbox or developer edition. This type of deployment is generally considered to be riskier, as it bypasses the testing and validation process.
D. Automatic deployment: This type of deployment uses tools or scripts to automate the deployment process, allowing changes to be deployed more quickly and efficiently.
E. Manual deployment: This type of deployment involves manually moving changes from one environment to another using tools such as the Salesforce Deployment Wizard or the Force.com Migration Tool.
There are several ways you can monitor the success of a Salesforce deployment:
A. Monitor system performance: Monitor the performance of your Salesforce instance to ensure that it is running smoothly after the deployment. This can be done using tools such as the Salesforce Monitoring Dashboard or custom monitoring tools.
B. Track user adoption: Track how users are interacting with the system after the deployment to ensure that they are able to use the new features and functionality effectively. This can be done using tools such as Salesforce analytics or custom tracking tools.
C. Monitor data quality: Monitor the quality of your data to ensure that it has not been negatively affected by the deployment. This can be done using tools such as the Data Quality Dashboard or custom data quality checks.
D. Collect feedback from users: Collect feedback from users about their experiences with the new features and functionality to identify any issues or areas for improvement. This can be done through surveys, focus groups, or other feedback mechanisms.
E. Monitor error logs: Monitor error logs to identify any issues that may have arisen during the deployment. This can be done using tools such as the Salesforce Debug Logs or custom error tracking tools.
By monitoring these factors, you can get a clear picture of the success of your Salesforce deployment and identify any areas for improvement.
We are more than just developers and consultants—we are your partners in navigating the digital landscape. Let us be the engine behind your next big success while you focus on your core vision.
Explore Opportunities!
 How Salesforce Helps Small Businesses Grow.webp)

 How to Improve Salesforce CRM Adoption in Your Organization.webp)